Archive for the ‘Tricks & Tips’ Category

Publishing a newly created Git branch to a remote repository can be easier than you might expect.

Introduction

It is a very often situation in various Git workflow models to create a new branch and push (publish) it to a remote repository. Majority of people creates a lot of new branches. Just to initialize a pull (merge) request, to show code to remote workmates or just to backup local changes overnight.

git publish branch

Unfortunately, it is not as easy in Git as it could be:

~/C/my-fancy-project (master|✓) $ git checkout -b featureX
Switched to a new branch 'featureX'

~/C/my-fancy-project (featureX|✓) $ git push
fatal: The current branch featureX has no upstream branch.
To push the current branch and set the remote as upstream, use

    git push --set-upstream origin featureX

Hmm, just copy-paste the given line and you are set:

~/C/my-fancy-project (featureX|✓) $ git push --set-upstream origin featureX
Total 0 (delta 0), reused 0 (delta 0)
To /tmp/my-fancy-project-remote/
 * [new branch]      featureX -> featureX
Branch 'featureX' set up to track remote branch 'featureX' from 'origin'.

Of course you may memorize it after some time (however, I observe that many people do not) or even use the shorter syntax:

~/C/my-fancy-project (featureX|✓) $ git push -u origin featureX
Total 0 (delta 0), reused 0 (delta 0)
To /tmp/my-fancy-project-remote/
 * [new branch]      featureX -> featureX
Branch 'featureX' set up to track remote branch 'featureX' from 'origin'.

Nonetheless, for me it was to many characters to type, especially repeated multiple times, especially in a typical workflow with one remote repository (usually named origin).

xkcd - Is It Worth the Time?

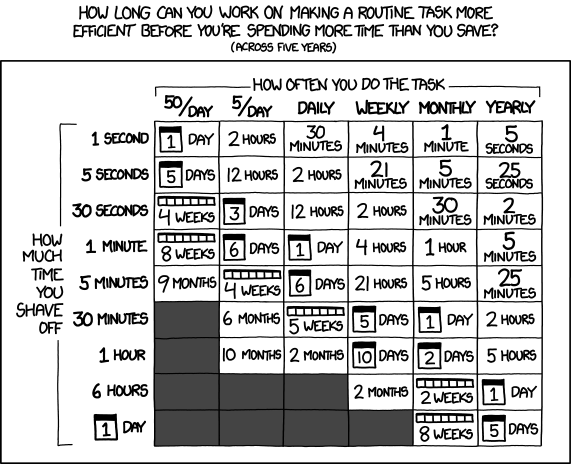
xkcd – Is It Worth the Time? – https://xkcd.com/1205/

Solution

The perfect solution for me would be just one command. Something like git publish.

~/C/my-fancy-project (master|✓) $ git checkout -b featureY
Switched to a new branch 'featureY'

~/C/my-fancy-project (featureY|✓) $ git publish
Total 0 (delta 0), reused 0 (delta 0)
To /tmp/my-fancy-project-remote/
 * [new branch]      featureY -> featureY
Branch 'featureY' set up to track remote branch 'featureY' from 'origin'.

Would not it be nice?

As you may know from my previous posts, I am a big enthusiast of comprehensive automation (such as CI/CD) or at least semi-automation (aka “making things easier”) when the previous is not possible (or viable). Therefore, at the time, I started looking at possible improvements. Git is written by developers for developers and offers different ways of customization. The easiest is write an alias. In that case is as simple as adding to ~/.gitconfig:

[alias]
    # Gets the current branch name - useful in other commands
    # Git 2.22 (June 2019) introduced "git branch --show-current"
    branch-name = "!git rev-parse --abbrev-ref HEAD"

    # Pushes the current branch to the remote "origin" (or the remote passed as the parameter)
    # and set it to track the upstream branch
    publish = "!sh -c 'git push -u ${1:-origin} $(git branch-name)' -"

As a result in addition to the basic case (seting an upstream branch to origin (if needed) and pushing branches from the current branch to origin):

$ git publish

it is also possible to do publish to some other remote repository:

$ git publish myOtherRemote

Cleaning up

As a counterpart to git publish, it is easy to implement git unpublish:

[alias]
    # Deletes the remote version of the current branch from the remote "origin"
    # (or the remote passed as the parameter)
    unpublish = "!sh -c 'git push ${1:-origin} :$(git branch-name) && git branch --unset-upstream $(git branch-name)' -"

to be remove the current branch from a remote repository (origin or passed as the second parameter):

~/C/my-fancy-project (featureNoLongerNeeded|✓) $ git unpublish
To /tmp/my-fancy-project-remote/
 - [deleted]         featureNoLongerNeeded

instead of:

~/C/my-fancy-project (featureNoLongerNeeded|✓) $ git push origin --delete featureNoLongerNeeded
To /tmp/my-fancy-project-remote/
 - [deleted]         featureNoLongerNeeded

or

~/C/my-fancy-project (featureNoLongerNeeded|✓) $ git push origin :featureNoLongerNeeded
To /tmp/my-fancy-project-remote/
 - [deleted]         featureNoLongerNeeded

Again, shorter and easier to remember.

Partial built-in solution

As proposed by indispensable Łukasz Szczęsny, hassle-free pushing only (without pulling) can be also achieved with Git configuration itself. It may be sufficient having branches removed automatically after a PR is merged (e.g. in properly configured GitLab or GitHub). In that case it is required to set pull.default configuration parameter to current:

~/C/my-fancy-project (master|✓) $ git checkout -b featureZ
Switched to a new branch 'featureZ'

~/C/my-fancy-project (featureZ|✓) $ git push -u
fatal: The current branch featureX has no upstream branch.
To push the current branch and set the remote as upstream, use

    git push --set-upstream origin featureZ

~/C/my-fancy-project (featureZ|✓) $ git config --global push.default current

~/C/my-fancy-project (featureZ|✓) $ git push -u
Total 0 (delta 0), reused 0 (delta 0)
To /tmp/my-fancy-project-remote/
 * [new branch]      featureZ -> featureZ
Branch 'featureZ' set up to track remote branch 'featureZ' from 'origin'.

~/C/my-fancy-project (featureZ|✓) $ git pull
Already up to date.

Please pay attention to the -u flag in git push -u. It is required to setup remote branch tracking. Without that git pull alone would not work.

Summary

I have been using git publish (and git unpublish) for many years and I really like it. Taking the opportunity of writing this Git Tricks blog series I decided to share it with others (felt in love in a command line :-) ). Remember, however, it is now a part GitKurka (or its uncensored upstream project) – a set of useful and productive tweaks and aliases for Git.

Btw, I do not conduct Git training anymore, but people wanting to develop their Git skills even more may consider an on-site course from Bottega (PL/EN), an online course by Maciej Aniserowicz (devstyle.pl) (PL) or a comprehensive Pro Git book (EN).

Update 20190910. Added partial built-in alternative solution suggested by Łukasz Szczęsny.
Update 20190913. Added missing “branch-name” alias. Pointed out by Paul in a comment.

The lead photo based on the Iva Balk‘s work published in Pixabay, Pixabay License.

Get know how to solve issue with pushing to submodules directly from the main repo while keeping the project easily cloneable by external contributors.

Introduction

The Git submodules mechanism is pretty handy to keep the source code of lousily related dependent software together in one Git repository while leaving their development separate. It is something like symlinks in the Unix world, but with an ability to refer also to the previous version. It’s quite popular in the projects using source code integration (instead of shared libraries) or to speed up development by making related changes in multiple repositories easier. It is not the only possible solution – Gradle, for instance, provides a composite build mechanism. Monorepo is an another approach, but it has its own limitations and it very problematic to use in FOSS projects developed by different people/teams.

As usual, I encountered that situation in one of my projects. As a big enthusiast of automatic code testing and Continuous Delivery, some time ago I have been working on improving the reliability of my (automatically released) gradle-nexus-staging-plugin. After each commit (so also before the release) I wanted to have the end-to-end tests executed to verify that the plugin is able to pass a simple (but real) project through the release process to Maven Central (aka The Central Repository).

I could move that test project to the plugin repository, but – well – it’s a distinct project which could be also released separately or replaced with some other project. In addition, testing two variants of releasing it was handy to use keep it in two branches “mounted” twice in my root repository.

gradle-nexus-staging-plugin
├── src
│   ├── funcTest
│   │   ├── groovy
│   │   │   └── ...
│   │   └── resources
│   │       └── sampleProjects
│   │           ├── nexus-at-minimal (submodule - master branch)
│   │           │   └── ...
│   │           ├── nexus-at-minimal-publish (submodule - publish branch)
│   │           │   └── ...
│   │           └── ...
│   ├── ...

Problem (aka Challenge)

gradle-nexus-staging-plugin contains a submodule nexus-at-minimal from a separate repo. Working on new fancy feature in GNSP it is needed to tweak the acceptance testing project. To make the development smoother it’s very useful to be able to commit introduces changes in the dependent project directly from the working copy of the main project. It works out of the box. However, later on we should also directly push them back to a separate repo of that dependent project (by stepping into the submodule and calling git push or – all-in-once by – using the git push --recurse-submodules=on-deamand parameter when pushing from the main repository). And then – in the long term – we encounter some inconvenience.

Let’s start by defining a submodule path to connect via SSH:

[submodule "src/funcTest/resources/sampleProjects/nexus-at-minimal"]
        path = src/funcTest/resources/sampleProjects/nexus-at-minimal
        url = git@gitlab.com:nexus-at/nexus-at-minimal.git

In general it works fine and pushing is allowed. However, any non-developer trying to clone that repo (and initialize submodules) gets:

...
git@gitlab.com: Permission denied (publickey).
fatal: Could not read from remote repository.

Please make sure you have the correct access rights
and the repository exists.

It’s pretty bad in the open source (FOSS) development where the projects are publicly available other people are encouraged to download (clone) it, build and contribute.

The obvious remedy to the previous error is switching to HTTPS:

[submodule "src/funcTest/resources/sampleProjects/nexus-at-minimal"]
        path = src/funcTest/resources/sampleProjects/nexus-at-minimal
        url = https://gitlab.com/nexus-at/nexus-at-minimal.git

However then, to allow developers to commit changes directly to a submodule it is required to go through a separate HTTPS authentication which in the most cases is completely not use in favor of SSH (and would need to be configured independently with an access token).

Transparent solution

To keep external contributors happy the developers could manually change the url in .gitmodules from HTTPS to SSH for every cloned project. However, it’s quite tedious. The better solution is an usage of pushInsteadOf. For the aforementioned example, the developers need only to add to the global ~/.gitconfig configuration file:

[url "git@gitlab.com:nexus-at/"]
    pushInsteadOf = https://gitlab.com/nexus-at/

It effectively overrides the push URL to use SSH instead of HTTPS for the whole group in GitLab/GitHub, covering also submodules (where HTTPS – external contributors friendly scheme – is left as a default).

Simple solution for the same server

As I use GitLab for my profession activity, at that time, I was evaluating its usage also for my FOSS project. Therefor, two different servers (providers) used for the main project and a submodule (here GitHub and GitLab). However, very often it is placed on the same server or even in the same group. In that case the configuration can be simplified even more with relative paths:

[submodule "src/funcTest/resources/sampleProjects/nexus-at-minimal"]
        path = src/funcTest/resources/sampleProjects/nexus-at-minimal
        url = ../nexus-at-minimal.git

The protocol used to clone the main repository (SSH or HTTPS) will be used also for a submodule.

Summary

URL rewriting and conditional configuration (covered in the first part) are just a subset of options available in Git to make the development more flexible and simple. Simple, assuming we already found the required features and learned how to use it ;-).

Update 20190405. Added simple solution with a relative path.

The lead photo based on the Mohamed Hassan‘s work published in Pixabay, Pixabay License.

Have you even committed to Git using wrong email address working on/for different projects/companies? Luckily with a little configuration Git can auto-switch the identities for you.

IMPORTANT. This blog has been archived. You may read an updated version of this post here.
Visit https://blog.solidsoft.pl/ to follow my new articles.

(Too long) introduction and reasoning

Being an (experienced) IT professional can give you an opportunity to work on different things in the same time frame. For instance, in addition to work for the main client, I do some consultancy stuff with code quality & testing and Continuoues Delivery for other companies. What’s more, I also conduct training sessions (will a lot of exercises with code) and work on my own and other’s FOSS projects. Usually, it is convenient to do it on the same computer. It can happen to commit something with the wrong email address (to be detected later on by an external auditor ;-) ) and a push with force to a remote master after rebase is not the best possible solution :-). I started with some Fish-based script to deal with it, but in the end I have found a built-in mechanism in Git itself.

Disclaimer. This particular blog post doesn’t treat about anything new or revolutionary. However, I’ve been living in unawareness long enough to give my blog readers a chance to know that mechanism right now.

superhero-git-identities

Project situation

My ~/Code directory structure could be simplified to something like that:

Code/
├── gradle-nexus-staging-plugin
├── mockito-java8
├── spock-global-unroll
├── ...
├── external-foss
│   ├── ...
│   ├── awaitility
│   └── spock
├── training
│   ├── ...
│   ├── code-testing
│   ├── java11
│   └── jenkins-as-code
└── work
    ├── ...
    ├── codearte
    └── companyX

The goal is to keep an email address in the company’s projects appropriate.

Solution

The first idea which can spring to your mind is to manually override git config user.email "..." in every clonned company repository. However, it’s tedious and error prone (especially in the microservice-based architecture :) ).

Luckily, one of the features introduces in Git 2.13.0 (long time ago – May 2017) is a conditional configuration applying (aka Conditional includes). Armed with it our task is pretty simple.

First, keep your default name and email defined in the [user] section in ~/.gitconfig:

[user]
  name = Marcin Zajączkowski
  email = foss.hacker@mydomain.example.com

Next, create a company related config file in the home directory, e.g. ~/.gitconfig-companyX with just overriden email address:

[user]
  email = marcin.zajaczkowski@companyx.example.com

Glue it together by placing in ~/.gitconfig the following code:

[includeIf "gitdir:~/Code/work/companyX/"]
  path = .gitconfig-companyX

The .gitconfig-companyX is applied only if a current path prefix matches the one defined in includeIf. Simple, yet powerful. That mechanism can be also used to configure different things – such as conditionally using GPG to sign your commits.

Btw, being a paranoid you can even remove the email field from the root configuration to be notified if you forgot to add an email for any new company you colaborate with.

Summary

Thanks to the includeIf mechanism you will never (*) again commit to a repo with wrong name or email. That and other Git related tricks and commands/aliases (such as collected in git-kurka make it easier to focus on delivering the stuff :).

Feel free to leave your favorite Git tips & tricks in the comments.

Update. From the comment made on priv:
– Git works great in that case, but for more generic changes in the environment variables Wybczu suggested very powerful direnv (with support for bash, zsh, tcsh, fish and elvish)

The lead photo based on the Elias Sch‘s work published in Pixabay, Pixabay License.

Learn how leverage Spock 1.2 to slice a Spring context of a legacy application writing integration tests.

IMPORTANT. This blog site has been archived. You may read an updated version of this post here.
Visit https://blog.solidsoft.pl/ to follow my new articles.

Have you ever wanted, having some legacy application which you were starting to work on, to write some tests to get know what is going on and possibly be notified about regressions? That feeling when you want to instantiate a single class and it fails with NullPointerException. 6 replaced (with difficulty) dependencies later there are still some errors from the classes that you haven’t heard about before. Sounds familiar?

There are different techniques to deal with hidden dependencies. There is the whole dedicated book about that (and probably a few other that I haven’t read). Occasionally, it may be feasible to start with the integration tests and run through some process. It may be even more “entertaining” to see what exotic components are required to just setup the context, even if they are completely not needed in our case. Thank you (too wide and carelessly used) @ComponentScan :).

Injecting stubs/mocks inside the test context is a way to go as an emergency assistance (see the last paragraph, there are better, yet harder approaches). It can be achieved “manually” with an extra bean definition with the @Primary annotation (usually a reason to think twice before doing that) for every dependency at which level we want to make a cut of (or for every unneeded bean which is instantiated by the way). @MockBean placed on a field in a test is more handy, but still, it is needed to define a field in our tests and put the annotation on it (5? 10? 15 beans?). Spock 1.2 introduces somehow less know feature which may be useful here – @StubBeans.

Mockied dependencies Spring context

It can be used to simply provide a list of classes which (possible) instances should be replaced with stubs in the Spring test context. Of course before the real objects are being instantiated (to prevent for example NPE in a constructor). Thanks to that up to several lines of stubbing/mock injections:

@RunWith(SpringRunner.class) //Spring Boot + Mockito
@SpringBootTest //possibly some Spring configuration with @ComponentScan is imported in this legacy application
public class BasicPathReportGeneratorInLegacyApplicationITTest { //usual approach

    @MockBean
    private KafkaClient kafkaClientMock;

    @MockBean
    private FancySelfieEnhancer fancySelfieEnhancerMock;

    @MockBean
    private FastTwitterSubscriber fastTwitterSubscriberMock;

    @MockBean
    private WaterCoolerWaterLevelAterter waterCoolerWaterLevelAterterMock;

    @MockBean
    private NsaSilentNotifier nsaSilentNotifierMock;

    //a few more - remember, this is legacy application, genuine since 1999 ;)
    //...

    @Autowired
    private ReportGenerator reportGenerator;

    @Test
    public void shouldGenerateEmptyReportForEmptyInputData() {
        ...
    }
}

can be replaced with just one (long) line:

@SpringBootTest //possibly some Spring configuration with @ComponentScan is imported in this legacy application
@StubBeans([KafkaClient, FancySelfieEnhancer, FastTwitterSubscriber, WaterCoolerWaterLevelAterter, NsaSilentNotifier/(, ... */])
  //all classes of real beans which should be replaced with stubs
class BasicPathReportGeneratorInLegacyApplicationITSpec extends Specification {

    @Autowired
    private ReportGenerator reportGenerator

    def "should generate empty report for empty input data"() {
        ....
    }
}

(tested with Spock 1.2-RC2)

It’s worth to mention that @StubBeans is intended just to provide placeholders. In a situation it is required to provide stubbing and/or an invocation verification @SpringBean or @SpringSpy (also introduced in Spock 1.2) are better. I wrote more about it in my previous blog post.

There is one important aspect to emphasize. @StubBeans are handy to be used in a situation when we have some “legacy” project and want to start writing integration regression tests quickly to see the results. However, as a colleague of mine Darek Kaczyński brightly summarized, blindly replacing beans which “explode” in tests is just “sweeping problems under carpet”. After the initial phase, when we are starting to understand what is going on, it is a good moment to rethink the way the context – both in production and in tests – is created. The already mentioned too wide @ComponentScan is very often the root of all evil. An ability to setup a partial context and put it together (if needed) is a good place to start. Using @Profile or conditional beans are the very powerful mechanisms in tests (and not only there). @TestConfiguration and proper bean selection to improve context caching are something worth to keep in your mind. However, I started this article to present the new mechanism in Spock which might be useful in some cases and I want to keep it short. There could be an another, more generic blog post just about managing the Spring context in the integration tests. I have to seriously thing about it :).

Tune up your JUnit test class template for Idea with the BDD-like syntax, Java 8 and the Mockito-AssertJ duo.

Topics covered in this article may seem trivial. However, from my trainer experience I know that (unfortunately) it is not a common practice. Therefore, I decided to write this short blog post to propagate them and to be able to refer to it in the future.

given-when-then-template

My favorite testing framework for Java (and Groovy) is Spock. However, its mocks are not suitable for some purpose and I still use Mockito in various places. In addition, I still conduct a lot of my testing training in a JUnit/Mockito/AssertJ variant for teams which already have a test suite in that stack and would like to improve their skills without changing the known technology. Therefore, as an interlude, this blog post about testing in the pure Java style and propose how to tune up your JUnit testing framework assuming that you are already using Mockito and AssertJ (you should give them a try in the other case).

This blog post consists of tree parts. Firstly, I propose a BDD-style section-based test structure to keep your test more consist and more readable. Next, I explain how simplify – using the AssertJ and Mockito – constructions with Java 8. Last, but not least, I show how to configure it in IntelliJ IDEA as a default JUnit test (class) template (which isn’t as trivial as it should).

Part 1. BDD-style sections

Well written unit tests should meet several requirements (but it is a topic for a separate post). One of the useful practices is a clear separation into 3 code blocks with precisely defined responsibility. You can read more on that topic in my previous blog post.

As a repetition just the core rules presented in a short form:

  • given – an object under test initialization + stubs/mocks creation, stubbing and injection
  • when – an operation to test in a given test
  • then – received result assertion + mocks verification (if needed)
@Test
public void shouldXXX() {
  //given
  ...
  //when
  ...
  //then
  ...
}

That separation helps to keep tests short and focused on just one responsibility to test (in the end it’s just an unit test).

In Spock those sections are mandatory (*) – without them a test will not even compile. In JUnit there are just comments. However, having them in place encourage people to use them instead of having one big block of mess inside (especially useful for newbies in a testing area).

Btw, the mentioned given-when-then convention is based on (is a subset of) a much wider Behavior-Driven Development concept. You may encounter a similar division on 3 code blocks named arrange-act-assert which in general is an equivalent.

Part 2. Java 8 for AssertJ and Mockito

One of the features of Java 8 is an ability to put default methods in an interface. That can be used to simplify of calling static methods which is prevalent in the testing frameworks such as AssertJ and Mockito. The idea is simple. A test class willing to use a given framework can implement a dedicated interface to “see” those methods as its own methods on code completion in an IDE (instead of static methods from external class which require giving a class name before or a static import). Under the hood those default methods just delegate execution to static methods. You can read more about it in my other blog post.

AssertJ natively supports those construction starting with version 3.0.0. Mockito 1.10 and 2.x are Java 6 compatible and therefore it is required to use a 3rd-party project – mockito-java8 (which should be integrated into Mockito 3 – once available).

To benefit from easier method completion in Idea it is enough to implement two interfaces:

import info.solidsoft.mockito.java8.api.WithBDDMockito;
import org.assertj.core.api.WithAssertions;

class SampleTest implements WithAssertions, WithBDDMockito {

}

Part 3. Default template in Idea

I’m a big enthusiast of omnipresent automation. Wouldn’t it be good to have both given-when-then sections and extra interfaces automatically in place in your test classes? Let’s eliminate those boring things from our life.

Test method

Changing a JUnit test method is easy. One of the possible ways is “CTRL-SHIFT-A -> File Template -> Code” and a modification of JUnit4 Test Method to:

@org.junit.Test
public void should${NAME}() {
  //given
  ${BODY}
  //when
  //then
}

To add a new test in an existing test class just press ALT-INSERT and select (or type) JUnit4 Test Method.

Test class

With the whole test class the situation is a little bit more complicated. Idea provides a way to edit existing templates, however, it is used only if a test is generated with CTRL-SHIFT-T from a production class. It’s not very handy with TDD where a test should be created first. It would be good to have a new position “New JUnit test class” next to “Java class” displayed if ALT-INSERT is pressed being in a package view in a test context. Unfortunately, to do that a new plugin would need to be written (a sample implementation for Spock). As a workaround we can define a regular file template which (as a limitation) will be accessible everywhere (e.g. even in a resource directory).

Do “CTRL-SHIFT-A -> File Template -> Files”, press INSERT, name template “JUnit with AssertJ and Mockito Test”, set extension to “java” and paste the following template:

package ${PACKAGE_NAME};

import info.solidsoft.mockito.java8.api.WithBDDMockito;
import org.assertj.core.api.WithAssertions;

#parse("File Header.java") 
public class ${NAME} implements WithAssertions, WithBDDMockito {

}

Showcase

We are already set. Let’s check how it can look in practice (click to enlarge the animation).

idea-test-templates-in-action

Summary

I hope I convinced you to tune your test template to improve readability of your tests and to safe several keystrokes per test. In that case, please spend 4 minutes right now to configure it in your Idea. Depending on a number of tests written it may start to pay off sooner than you expect :).

Btw, at the beginning of October I will be giving a presentation about new features in Mockito 2 at JDD in Kraków.

JDD logo

Self promotion. Would you like to improve your and your team testing skills and knowledge of Spock/JUnit/Mockito/AssertJ quickly and efficiently? I conduct a condensed (unit) testing training which you may find useful.

Stubbing methods returning java.util.Optional with Spock is more tricky that you would probably expect. Get know how to do it efficiently.

by Infrogmation, Wikimedia Commons, public domain

Introduction

One of the nice features of the mocking framework in Spock is an ability to return sensible default values for unstubbed method calls made on stubs. Empty list for a method returning List, 0 for long, etc. Very handy if you don’t care about returned value in a particular test, but for example would like to prevent NullPointerException later in the flow. Unfortunately Spock 1.0 and 1.1-rc-2 (still compatible with Java 6) is completely not aware of types added in Java 8 (such as Optional or CompletableFutures). You may say “no problem” null is acceptable in many cases, but with Optional the situation is even worse.

Issue

Imaging the following code – method returning Optional and a try to use it in a test:

interface Repository<T> {
    Optional<T> getMaybeById(long id)
}

@Ignore("Broken")
def "should not fail on unstubbed call with Optional return type"() {
    given:
        Dao<Order> dao = Stub()
    when:
        dao.getMaybeById(5)
    then:
        noExceptionThrown()
}

You may think – null will be returned on the getMaybeById() call, but it’s not.

Expected no exception to be thrown, but got 'org.spockframework.mock.CannotCreateMockException'

    at spock.lang.Specification.noExceptionThrown(Specification.java:119)
    at info.solidsoft.blog.spock10.other.CustomDefaultResponseSpec.should not fail on unstubbed call with Optional return type(CustomDefaultResponseSpec.groovy:19)
Caused by: org.spockframework.mock.CannotCreateMockException: Cannot create mock for class java.util.Optional because Java mocks cannot mock final classes. If the code under test is written in Groovy, use a Groovy mock.
    at org.spockframework.mock.runtime.JavaMockFactory.createInternal(JavaMockFactory.java:49)
    at org.spockframework.mock.runtime.JavaMockFactory.create(JavaMockFactory.java:40)
(...)

The test fails at runtime as Spock is not able to stub java.util.Optional which is a final class:

CannotCreateMockException: Cannot create mock for class java.util.Optional
    because Java mocks cannot mock final classes.

What we can do?

Two workarounds

The EmptyOrDummyResponse factory class (which tries to be smart) is used by default for stubs when an ustubbed method is being called. However, it can be changed on demand during a stub creation:

def "should not fail on unstubbed call with Optional return type - workaround 1"() {
    given:
        Dao<Order> dao = Stub([defaultResponse: ZeroOrNullResponse.INSTANCE])
    when:
        dao.getMaybeById(5)
    then:
        noExceptionThrown()
}

This test will pass (getMaybeById() just returned null), but there is an easier way to achieve the same result.

Spock uses EmptyOrDummyResponse only for stubs (created with a Stub() method). For mocks (created with a Mock() method) the ZeroOrNullResponse factory is used (which makes sense as mocks should focus on interaction verification not just stubbing). Thanks to that a smart logic trying to return sensible default value is disabled in much simpler way:

def "should not fail on unstubbed call with Optional return type - workaround 2"() {
    given:
        Dao<Order> dao = Mock()
    when:
        dao.getMaybeById(5)
    then:
        noExceptionThrown()
}

However, this workaround is far from being perfect. Firstly, your colleagues may be surprised why a mock is created while only stubbing is performed (by the way, both stubbing and verifying interaction on the same mock is tricky itself in Spock, but this is a topic for an another blog post). Secondly, wouldn’t it be nice to have an empty optional (instead of null) returned by default?

Solution

In addition to an aforementioned way to use predefined factories for default return types Spock provides an ability to write a custom one. Let’s create EmptyOrDummyResponse-life factory which is aware of Java 8 types. In fact, the implementation is very straightforward:

class Java8EmptyOrDummyResponse implements IDefaultResponse {

    public static final Java8EmptyOrDummyResponse INSTANCE = new Java8EmptyOrDummyResponse()

    private Java8EmptyOrDummyResponse() {}

    @Override
    public Object respond(IMockInvocation invocation) {
        if (invocation.getMethod().getReturnType() == Optional) {
            return Optional.empty()
        }
        //possibly CompletableFutures.completedFuture(), dates and maybe others

        return EmptyOrDummyResponse.INSTANCE.respond(invocation)
    }
}

Our class implements an IDefaultResponse interface with one respond() method. Inside, we can apply custom logic for Optional, CompletableFutures and maybe other Java 8 specific types. As a fallback (for “standard” types) we switch to the original EmptyOrDummyResponse. This code works as expected:

@SuppressWarnings("GroovyPointlessBoolean")
def "should return empty Optional for unstubbed calls"() {
    given:
        Dao<Order> dao = Stub([defaultResponse: Java8EmptyOrDummy.INSTANCE])
    when:
        Optional<Order> result = dao.getMaybeById(5)
    then:
        result?.isPresent() == false    //NOT the same as !result?.isPresent()
}

Please pay attention to consider Groovy truth implementation while making assertions with Optional. !result?.isPresent() would be fulfilled also for null returned from a method.

However, maybe it would be good to simplify a Java 8 aware stub creation a little bit? To do that an extra method can be created:

private <T> T Stub8(Class<T> clazz) {
    return Stub([defaultResponse: Java8EmptyOrDummy.INSTANCE], clazz)
}

@SuppressWarnings("GroovyPointlessBoolean")
def "should return empty Optional for unstubbed calls with Stub8"() {
    given:
        Dao<Order> dao = Stub8(Dao)
    when:
        Optional<Order> result = dao.getMaybeById(5)
    then:
        result?.isPresent() == false    //NOT the same as !result?.isPresent()
}

Unfortunately in in that case an enhanced more compact stub creation syntax available in Spock 1.1 cannot be used with our Stub8() method. All because Spock will not be able to determine it’s type looking on he left side on assignment. In the end, however, it is much shorter than setting defaultResponse in an every stub creation.

Please note that due to Spock limitations that method cannot be put in a trait (or a separate class) and has to be defined in the current test or a custom base (super) class for all the tests (extending itself spock.lang.Specification), e.g.:

abstract class Java8AwareSpecification extends Specification {
    protected <T> T Stub8(Class<T> clazz) { ... }
}

class MyFancyTest extends Java8AwareSpecification { ... }

Summary

Thanks to exploring some Spock internals related to a stub and mock creation it was possible to enhance default strategy for smart responses for unstubbed calls to nicely support Java 8 features. This is just one of the topics I covered in my advanced “Interesting nooks and crannies of Spock you (may) have never seen before” presentation gave at Gr8Conf Europe 2016. You may want to see it :-).

Btw, the good news is that upcoming Spock 1.1(-rc-3) will contain native support for returning sensible default values for unstubbed Optional method calls.

Self promotion. Would you like to improve your and your team testing skills and knowledge of Spock quickly and efficiently? I conduct a condensed (unit) testing training which you may find useful.

Learn how to visualize complex input parameters in parameterized tests in the way improving the readability of the test report.

Trimmed Hedge

By Tomwsulcer – CC0, Wikipedia

Introduction

Parameterized tests can simplify the way how the same functionality can be verified with different input parameters. Spock with its where block, data tables and data pipes makes it very easy to use in a very readable way. The input parameters are nicely presented in a test execution report (in IDE, Jenkins or generated HTML). They can be formatted in a desired order and completed with a custom constant message. It usually works flawlessly for simple objects (such as numbers, booleans, enums and strings). However, in the situation where complex objects are used (e.g. bigger value objects or custom classes) the whole output can be hijacked by just one very verbose parameter:

Very long full toString

or meaningless default toString() implementation: foo.bar.Unknown@78ac1102:

Meaningless Default toString in tests

Our sample code base

To present different available approaches I will use a very simplified version of an account & invoice related domain implemented with DDD in one of the projects I worked in.

The main class here is Invoice which represents an invoice :). The object is immutable (here with Groovy AST transformation, but it could be also achieved with Project Lombok or manually) which means that methods modifying a state return a new version of this class.

@Immutable
class Invoice {

    enum Status {
        ISSUED, PAID, OVERDUE, CANCELLED
    }

    Status status
    BigDecimal issuedAmount
    BigDecimal remainingAmount
    LocalDate issueDate
    //some other fields

    //different production methods

    //production toString() with all useful business fields
}

There is also Account class with an amountToPay() method returning amount to pay based in open invoices.

Naive approach (strongly not recommended)

As the first idea one could be tempted to modify toString() method implementation to, for example, display only 2 of the 10 fields in a class. However, it is a bad idea to change production toString() just for the better output in tests. What is more, other tests or error reporting in a production system can prefer to display more information. Luckily in Spock we have two nice techniques to cope with it.

Technique 1 – an extra formatting method

Test/specification names in Spock can be enhanced with #parameterName (not with $ character used internally by Groovy which is not allowed in a method name) placed in a test name or in an @Unroll annotation. In addition there is an ability to use object property value or call a parameterless method.

class AmountToPayInvoiceAccountSpec extends Specification {

    def "paid and cancelled invoices (#invoice.formatForTest()) should be ignored in current amount to pay"() {
        given:
            Account account = AccountTestFixture.createForInvoice(invoice)
        expect:
            account.amountToPay() == 0.0
        where:
            invoice << [paidInvoice, cancelledInvoice]
    }

    (...)
}

//required modifications in production code
class Invoice {

   (...)

   String formatForTest() {
       return "$issuedAmount: $status"
   }

Test specific production method - result

It’s nice to get just two fields from an object, however, in many cases we don’t want to add an artificial formatting method to production code just to be used in tests.

A tip. Don’t forget to enable unrolling of paremterized tests to instruct Spock to create a separate (sub)test for every input parameters set. It can be done manually by placing @Unroll annotation on an every parameterized method or at the class level. Alternatively the spock-global-unroll extension can be used to turn it on automatically in the whole project.

Technique 2 – an extra input parameter

Luckily, as an alternative it is possible to define an another artificial input parameter directly in a test. It looks like a ordinarily variable, but has access to a set of input parameters (for a given iteration) and can operate on they. That extra parameter is treated by Spock equally to others (however usually there is no need to reference to it in a test code – beside a test name).

class AmountToPayInvoiceAccountSpec extends Specification {

    @Shared
    private Invoice first = createOpenForAmount(200)
    @Shared
    private Invoice second = createOpenForAmount(300)

    def "current amount to pay (#expectedToPayAmount) should ignore paid and cancelled invoices (#invoicesDesc)"() {
        given:
            Account account = AccountTestFixture.createForInvoices(invoices)
        expect:
            account.amountToPay() == expectedToPayAmount
        where:
            invoices                   || expectedToPayAmount
            [paid(first), second]      || 300.0
            [first, cancelled(second)] || 200.0
            [first, second]            || 500.0

            invoicesDesc = createInvoicesDesc(invoices)
    }

    (...)
}

Implementation note. Methods createOpenForAmount() as well as paid() and cancelled() are implemented in a test specific InvoiceTestFixture class.

The result looks very nicely:
spock-formatting-input-parameters-test-specified-result

Just from the report it is pretty visible that there is a (regression) issue with handling CANELLED invoices. The assertion error is also helpful:

spock-formatting-input-parameters-test-specified-error-message

It’s worth to notice in this place that this technique can be also mixed with data pipes (in addition to data tables):

    where:
        invoice << [paidInvoice, cancelledInvoice]
        invoiceDesc = createInvoiceDesc(invoice)

A tip. Pay attention that in opposite to regular parameters in Spock the artificial one is created with an = operator not with <<.

Summary

The aforementioned techniques can be used to improve the readability of your test execution report. It’s useful during the development, but what is even more important it becomes indispensable if Spock is used for Behavior Driven Development and reports are read by, so called, Business People (i.e. need to be worded in the specific way).

[OT] The reason to bring up this topic is a fact that recently two colleagues of mine were struggling with that issue in their tests. Unfortunately they overlooked that slide in my advanced Spock presentation at Gr8Conf EU ;). Blessing in disguise, I was in the office to support them immediately. Nevertheless, not so long ago I’ve seen a presentation by Scott Hanselman about productivity. I liked the idea that every good question is worth to be answered on a blog. Replying privately (especially via email) usually can help only just one person. Writing a blog post and sending that person a link in addition can help other people struggling with the same issue.

Self promotion. Would you like to improve your and your team testing skills and knowledge of Spock quickly and efficiently? I conduct a condensed (unit) testing training which you may find useful.

Get know how to create mocks and spies in even more compact way with Spock 1.1

Introduction

Spock heavily leverages operator overloading (and Groovy magic) to provide very compact and highly readable specifications (tests) which wouldn’t be able to achieve in Java. This is very clearly visible among others in the whole mocking framework. However, preparing my Spock training I found a place for further improvements in a way how mocks and spies are created.

Shorter and shorter pencils

The Groovy way

Probably the most common way to create mocks (and spies) among devoted Groovy & Grails users is:

def dao = Mock(Dao)

The type inference in IDE works fine (there is type aware code completion). Nonetheless, this syntax is usually less readable for Java newcomers (people using Spock to tests production code written in Java) and in general for people preferring strong typing (including me).

The Java way

The same mock creation in the Java way would look as above:

Dao dao = Mock(Dao)

The first impression about this code snipped is – very verbose. Well, it is a Java way – why should we expect anything more ;).

The shorter Java way

As I already mentioned Spock leverages Groovy magic and the following construction works perfectly fine:

Dao dao = Mock()

Under the hood Spock uses a type used in the left side of an assignment to determine a type for which a mock should be created. Nominally everything is ok. Unfortunately there is one awkward limitation:

spock-1-0-mock-warning

IDE complains about unsafe type assignment and without getting deeper into the logic used in Spock it is justified. Luckily the situation is not hopeless.

The shorter Java way – Spock 1.1

Preparing practical exercises for my Spock training some time ago gave me an excuse to get into the details of implementation and after a few minutes I was able to improve the code to make it work cleanly in IDE (after a few years of living with that limitation!).

Dao dao = Mock()

spock-1-1-mock-no-warning2

No warning in IDE anymore.

Summary

Multiple times in my career I experienced a well known truth that preparing a presentation is very educational also for the presenter. In a case of a new 3-day long training it is even more noticeable – attendees have much more time to ask you uncomfortable question :). Not for the first time my preparations resulted in a new feature or an enhancement in some popular libraries or frameworks.

The last code snippet requires Spock in version 1.1 (which as a time of writing is available as the release candidate 3 – 1.1-rc-3 to not trigger a warning in IDE. There is a lot of new features in Spock 1.1 – why wouldn’t you give it a try? :)

Picture credits: GDJ from openclipart.org

Get know how to enable named method parameters support in a Gradle project

Introduction

Java 8 has introduced (among others) an ability to get a method parameter name at runtime. For backward compatibility (mostly with existing bytecode manipulation tools) it is required to enable it explicitly. The operation is as simple as an addition of a -parameters flag to a javac call in hello world tutorials. However, it turns out to be more enigmatic to configure in a Gradle project (especially for Gradle newcomers).

PensiveDuke

Gradle

To enable support for named method arguments it is required to set it for every java compilation task in a project. It can be easily attained with:

tasks.withType(JavaCompile) {
    options.compilerArgs << '-parameters'
}

For multi-project build the construction has to be applied on all the subprojects, e.g.:

subprojects {
    (...)
    tasks.withType(JavaCompile) {
        options.compilerArgs << '-parameters'
    }
}

Rationale

For me as a Gradle veteran and Gradle plugins author construction withType and passing different compilation or runtime JVM options is a bread and butter. However, I needed to explain it more than once to less Groovy experienced workmates, so for further reference (aka “Have you read my blog? ;-) ) I have written it down. As a justification for them I have to agree that as a time of writing this blog post the top Google results point to Gradle forum threads containing also “not so good” advises. Hopefully my article will be positioned higher :-).

Tested with Gradle 2.14 and OpenJDK 1.8.0_92.

Image credits: https://duke.kenai.com/

The simply way how buildscript dependencies (e.g. plugins) can be displayed and analyzed in Gradle

Introduction

This is the third part of my Gradle tricks mini-series related to visualization and analyze of dependencies. In the first post I presented a way how dependencies for all subprojects in multi-project build can be display. In the second I showed a technique of useful in tracking down not expected transitive dependencies in the project. This time less often used things, yet crucial in specific cases – buildscript dependencies.

Dependencies

Real use case

Buildscript dependencies contains plugins used in our project and their dependencies. It would seem nothing interesting unless you are a Gradle plugin developer, but it is not completely true. Once, as a consultant, I was investigating issue with NoSuchMethodException in a large project with custom build framework built on top of Gradle. The problem occurred only when one innocent, very popular open source plugin had been adding to the project. The same plugin worked fine in many other project in that company. In the end I was able to figure out that one of the dependencies used in buildSrc custom scripts overriding the same dependencies in older version from the plugin. As a result plugin failed at runtime with mentioned NoSuchMethodException. To achieve that I had to use my custom script as buildscript/classpath dependencies are completely ignored when ./gradlew dependencies or ./gradlew dependencyInsight is used.

Solution

The idea to write this post arose in at the beginning of 2015. I wanted to present my small Gradle task that using some internal Gradle mechanisms retrieves buildscript dependencies in display them to a console. The post was postponed and almost a year later I was positively surprised reading release notes for Gradle 2.10. The new buildEnvironment task was added.

$ ./gradlew buildEnvironment
:buildEnvironment

------------------------------------------------------------
Root project
------------------------------------------------------------

classpath
+--- com.bmuschko:gradle-nexus-plugin:2.3
\--- io.codearte.gradle.nexus:gradle-nexus-staging-plugin:0.5.3
     \--- org.codehaus.groovy.modules.http-builder:http-builder:0.7.1
          +--- org.apache.httpcomponents:httpclient:4.2.1
          |    +--- org.apache.httpcomponents:httpcore:4.2.1
          |    +--- commons-logging:commons-logging:1.1.1
          |    \--- commons-codec:commons-codec:1.6
          +--- net.sf.json-lib:json-lib:2.3
          |    +--- commons-beanutils:commons-beanutils:1.8.0
          |    |    \--- commons-logging:commons-logging:1.1.1
          |    +--- commons-collections:commons-collections:3.2.1
          |    +--- commons-lang:commons-lang:2.4
          |    +--- commons-logging:commons-logging:1.1.1
          |    \--- net.sf.ezmorph:ezmorph:1.0.6
          |         \--- commons-lang:commons-lang:2.3 -> 2.4
          +--- net.sourceforge.nekohtml:nekohtml:1.9.16
          \--- xml-resolver:xml-resolver:1.2

(*) - dependencies omitted (listed previously)

BUILD SUCCESSFUL

Total time: 1.38 secs

Two plugins and a pack of transitive dependencies to gradle-nexus-staging-plugin thanks to http-builder (maybe it would be good to replace it with Jodd?).

Summary

It is worth to be able to distinguish standard projects dependencies and buildscript dependencies. The new buildEnvironment task helps to deal with the latter. This in turn becomes essential when strange runtime errors start to show up.

Tested with Gradle 2.10.

Picture credits: Zeroturnaround.