Posts Tagged ‘gradle’

Get know what you can expect from Spock 2.0 M2 (based on JUnit 5), how to migrate to it in Gradle and Maven, and why it is important to report spotted problems :).

IMPORTANT. This blog site has been archived. You may read an updated version of this post here.
Visit https://blog.solidsoft.pl/ to follow my new articles.

Important note. I definitely do not encourage you to migrate your real-life project to Spock 2.0 M1 for good! This is the first (pre-)release of 2.x with not finalized API, intended to gather user feedback related to internal Spock migration to JUnit Platform.

This blog post arose to try to encourage you to make a test migration of your projects to Spock 2.0, see what started to fail, fix it (if caused by your tests) or report it (if it is a regression in Spock itself). As a result – at the Spock side – it will be possible to improve the code base before Milestone 2. The benefit for you – in addition to contribution to the FOSS project :-) – will be awareness of required changes (kept in a side branch) and readiness to migration once Spock 2.0 is more mature.

I plan to update this blog post when the next Spock 2 versions are available.

Updated 2020-02-10 to cover Spock 2.0 M2 with a dedicated Groovy 3 support.

Spock 2 + JUnit 5

Powered by JUnit Platform

The main change in Spock 2.0 M1 is migration to JUnit 5 (precisely speaking to execute tests with JUnit Platform 1.5, part of JUnit 5 instead of the JUnit 4 runner API). This is very convenient as Spock tests should be automatically recognized and executed everywhere the JUnit Platform is supported (IDEs, build tools, quality tools, etc.). In addition, the features provided by the platform itself (such as parallel test execution) should be (eventually) available also for Spock.

Gradle

To bring Spock 2 to a Gradle project it is needed to bump the Spock version:

testImplementation('org.spockframework:spock-core:2.0-M2-groovy-2.5')

and activate tests execution by JUnit Platform:

test {
    useJUnitPlatform()
}

Update 20200218. It is enough, but as Tomek Przybysz reminded in his comment, Gradle by default doesn’t fail if not tests are found. It may lead to a situation when after making that switch a build finished successfully, giving a false sense of security, while there are no tests executed at all.
It is a known issue in Gradle, not only limited to Spock. As a woraround the aforementioned configuration might be extended to:

test {
    useJUnitPlatform()

    afterSuite { desc, result ->
        if (!desc.parent) {
            if (result.testCount == 0) {
                throw new IllegalStateException("No tests were found. Failing the build")
            }
        }
    }
}

Maven

With Maven on the other hand, it is still required to switch to a never Spock version:

<dependency>
  <groupId>org.spockframework</groupId>
  <artifactId>spock-core</artifactId>
  <version>2.0-M2-groovy-2.5</version>
  <scope>test</scope>
</dependency>

but that is all. The Surefire plugin (if you use version 3.0.0+) executes JUnit Platform tests by default, if junit-platform-engine (a transitive dependency of Spock 2) is found.

The minimal working project for Gradle i Maven is available from GitHub.

Other changes

Having such big change as migration to JUnit Platform, number of other changes in Spock 2.0 M1 is limited, to make finding a reason of potential regressions a little bit easier. As a side effects of the migration itself, the required Java version is 8.

In addition, all parameterized tests are (finally) “unrolled” automatically. That is great, however, currently there is no way to “roll” particular tests, as known from spock-global-unroll for Spock 1.x.

Some other changes (such as temporarily disabled SpockReportingExtension) can be found in the release notes.

More (possibly breaking) changes are expected to be merged into Milestone 2.

Issue with JUnit 4 rules

The tests using JUnit 4 @Rules (or @ClassRules) are expected to fail with an error message suggesting that requested objects were not created/initialized before a test (e.g. NullPointerException or IllegalStateException: the temporary folder has not yet been created) or were not verified/cleaned up after it (e.g. soft assertions from AssertJ). The Rules API is no longer supported by JUnit Platform. However, to make the migration easier (@TemporaryFolder is probably very often used in Spock-based integration tests), there is a dedicated spock-junit4 which internally wraps JUnit 4 rules into the Spock extensions and executes it in the Spock’s lifecycle. As it is implemented as a global extension, the only required thing to add is another dependency. In Gradle:

testImplementation 'org.spockframework:spock-junit4:2.0-M2-groovy-2.5'

or in Maven:

<dependency>
    <groupId>org.spockframework</groupId>
    <artifactId>spock-junit4</artifactId>
    <version>2.0-M2-groovy-2.5</version>
    <scope>test</scope>
</dependency>

That makes migration easier, but it is good to think about a switch to native Spock counterpart, if available/feasible.

Groovy 3 support

Updated 2020-02-10. The whole Groovy 3 section was added to cover changes in Spock 2.0 Milestone 2.

After my complains about runtime failure when Spock 2.0 M1 is used with Groovy 3.0, I rolled up my sleeves to check how hard would it be to provide that support. It took me some time, however, after after 23 (multiple times rebased) commits, constructive feedback from other Spock contributors and fruitful discussion with the Groovy developers, the support for Groovy 3 has been merged and is available as the main feature of Spock 2.0 M2, released right after Groovy 3.0.0 final.

To use Spock 2.0 M2 with Groovy 3 it is enough to just use the spock-*-2.0-M1 artifacts with the -groovy-3.0 suffix.

It is worth noting that Groovy 3 is not backward compatible with Groovy 2. To keep one Spock codebase, there is a layer of abstraction in Spock to allow to build (and use) the project with both Groovy 2 and 3. As a result, an extra artifact spock-groovy2-compat is (automatically) used in projects with Groovy 2. It is very important to do not mix the spock-*-2.x-groovy-2.5 artifacts with the groovy-*-3.x artifacts on a classpath. This may result in weird runtime errors.

I’m really happy that developers can immediately start testing the new Groovy 3.0.0 with Spock 2.0-M2 in their projects. In addition, as Spock is quite important (and low level) project in the Groovy ecosystem, it was nice to confirm that Groovy 3 works properly with it (and to report – along the way – a few minor detected issues to make Groovy even better ;-) ).

Other issues and limitations

Updated 2020-02-10. This section originally refereed to limitations of Spock 2.0 M1. Milestone 2 supports Groovy 3.

Spock 2.0 M1 is compiled and tested only with Groovy 2.5.8. As of M1, execution with Groovy 3.0 is currently blocked at runtime. Unfortunately, instead of a clear error message about incompatible Groovy version there is only a very cryptic error message:

Could not instantiate global transform class org.spockframework.compiler.SpockTransform specified at
jar:file:/.../spock-core-2.0-M1-groovy-2.5.jar!/META-INF/services/org.codehaus.groovy.transform.ASTTransformation
because of exception java.lang.reflect.InvocationTargetException

It is already reported and should be enhanced by M2.

Sadly, the limitation to Groovy 2.5 only, reduces potential feedback from people experimenting with Groovy 3 which is pretty close to a stable version (RC2 as of 2019/2020). It’s especially inconvenient as many Spock tests just work with Groovy 3 (of course there are some corner cases). There is a chance that Spock 2 before getting final will be adjusted to changes in Groovy 3 or at least the aforementioned hard limitation will be lifted. In the meantime, it is required to test Groovy 3 support with the snapshot version – 2.0-groovy-2.5-SNAPSHOT (which has that check disabled).

Summary

The action to do after reading this post is simple. Try to temporarily play with Spock 2.0 M2 in your projects and report any spotted issues, to help make Spock 2.0 even better :).

Make your (automatic) releasing to Maven Central from Travis (and not only) more reliable thanks to the explicit staging repository creation feature set implemented at the edge of 2018 and 2019.

Background

If you are only interested in getting information how to make your artifacts releasing more reliable from Travis, move forward to the another section.

Automatic artifacts releasing (using a staging repository and its promotion) from Gradle to Maven Central has been always tricky. The Nexus REST API related to those operations is very poorly documented. In addition, Gradle doesn’t natively support uploading artifacts to a dedicated staging repository even if it was already created explicitly. In the result a heuristic to determine which repository contains just uploaded artifacts has to be used, what brings some serious limitations. The apogee of the problems was to have Travis changes its architecture to more stateless in the late autumn of 2018. It caused the upload requests for particular artifacts to be routed via machines with different IP addresses, which resulted in multiple stating repositories created for a single gradle uploadArchives or gradle publish calls. That made automatic artifact releasing with Gradle from Travis completely broken. Up until now.

reliable-releasing-to-maven-central

Improvements

Two good things happened at the edge of the years. The first was the appearance of the new nexus-publish plugin by Marc Philipp. It creates an explicit staging repository using the Nexus API and enhance the Gradle publish task to use that repository. The second thing was an enhancement in my gradle-nexus-staging plugin which started to allow setting the staging repository ID which should be used during the release operation. That leaded to improve the reliability of releasing to Maven Central using Gradle.

Instead of relying on a heuristic to determine which repository should be used for release, the new staging repository is explicitly created. The artifacts are uploaded directly to it, it is closed and releasing. Thanks to that, everything works smother and it more error-proof. In addition, there is no problem with parallel releasing of different projects belonging to the same staging profile and it finally works properly back again with Travis.

Configuration

This post assumes you have already configured uploading your artifacts to Maven Central (aka The Central Repository) using the maven-publish plugin. If not you may consult this link. This configuration will make your deployment and releasing more reliable without a need to do any manual operations in Nexus UI.

plugins {
    ... //other plugins used in your project
    id 'io.codearte.nexus-staging' version '0.20.0'
    id 'de.marcphilipp.nexus-publish' version '0.2.0'
}

publishing {
    ... //your current publishing to Maven Central configuration
}

//optionally
nexusStaging {
    packageGroup = "your-package-group-if-different-than-groupId"
}

//optionally
nexusPublishing {
    //for custom configuration if needed - credentials
    //       are by default taken from nexus-staging
    //       or from properties nexusUsername and nexusPassword
}

Do you expect much more code (configuration) to write? Everything is hidden in the plugins which leverage each other. Just please remember to use nexus-staging 0.20.0+ and nexus-publish 0.2.0+.

After that artifacts uploading with releasing is a matter of one command:

./gradlew publish closeAndReleaseRepository

Calling the publish task (or publishToNexus for the older versions) creates a staging repository and memorized its ID. closeAndReleaseRepository closes and releases that one particular repository. After a few minutes your artifacts should be available in Maven Central.

Important. Bear in mind that publish (or publishToNexus) and closeAndReleaseRepository has to be used in the one Gradle execution to be able to leverage explicitly created staging repository.

Update 20190506. With nexus-publish 0.2.0+ calling just publish instead of publishToNexus is enough to trigger the logic, so the sample command was simplified.

Summary

Gradle is a very nice build tool where (almost) the sky is the limit. Unfortunately, there are still some long lasting issues which require using some hacks or writing custom plugins to overcome them. The promising is that with every release they are slowly fixed/implemented. To solve that particular problem a bottom-up work was required to bring releasing back for Travis and more reliable in general.

Please note. The presented approach works pretty well for using the (recently improved) publishing plugin. If you still use the old maven plugin (having the uploadArchives task instead of publish one) you need to migrate and/or put your comment in the corresponding issue.

The lead photo based on the Siala‘s work published in Pixabay, Pixabay License.

Get know how to enable named method parameters support in a Gradle project

Introduction

Java 8 has introduced (among others) an ability to get a method parameter name at runtime. For backward compatibility (mostly with existing bytecode manipulation tools) it is required to enable it explicitly. The operation is as simple as an addition of a -parameters flag to a javac call in hello world tutorials. However, it turns out to be more enigmatic to configure in a Gradle project (especially for Gradle newcomers).

PensiveDuke

Gradle

To enable support for named method arguments it is required to set it for every java compilation task in a project. It can be easily attained with:

tasks.withType(JavaCompile) {
    options.compilerArgs << '-parameters'
}

For multi-project build the construction has to be applied on all the subprojects, e.g.:

subprojects {
    (...)
    tasks.withType(JavaCompile) {
        options.compilerArgs << '-parameters'
    }
}

Rationale

For me as a Gradle veteran and Gradle plugins author construction withType and passing different compilation or runtime JVM options is a bread and butter. However, I needed to explain it more than once to less Groovy experienced workmates, so for further reference (aka “Have you read my blog? ;-) ) I have written it down. As a justification for them I have to agree that as a time of writing this blog post the top Google results point to Gradle forum threads containing also “not so good” advises. Hopefully my article will be positioned higher :-).

Tested with Gradle 2.14 and OpenJDK 1.8.0_92.

Image credits: https://duke.kenai.com/

The simply way how buildscript dependencies (e.g. plugins) can be displayed and analyzed in Gradle

Introduction

This is the third part of my Gradle tricks mini-series related to visualization and analyze of dependencies. In the first post I presented a way how dependencies for all subprojects in multi-project build can be display. In the second I showed a technique of useful in tracking down not expected transitive dependencies in the project. This time less often used things, yet crucial in specific cases – buildscript dependencies.

Dependencies

Real use case

Buildscript dependencies contains plugins used in our project and their dependencies. It would seem nothing interesting unless you are a Gradle plugin developer, but it is not completely true. Once, as a consultant, I was investigating issue with NoSuchMethodException in a large project with custom build framework built on top of Gradle. The problem occurred only when one innocent, very popular open source plugin had been adding to the project. The same plugin worked fine in many other project in that company. In the end I was able to figure out that one of the dependencies used in buildSrc custom scripts overriding the same dependencies in older version from the plugin. As a result plugin failed at runtime with mentioned NoSuchMethodException. To achieve that I had to use my custom script as buildscript/classpath dependencies are completely ignored when ./gradlew dependencies or ./gradlew dependencyInsight is used.

Solution

The idea to write this post arose in at the beginning of 2015. I wanted to present my small Gradle task that using some internal Gradle mechanisms retrieves buildscript dependencies in display them to a console. The post was postponed and almost a year later I was positively surprised reading release notes for Gradle 2.10. The new buildEnvironment task was added.

$ ./gradlew buildEnvironment
:buildEnvironment

------------------------------------------------------------
Root project
------------------------------------------------------------

classpath
+--- com.bmuschko:gradle-nexus-plugin:2.3
\--- io.codearte.gradle.nexus:gradle-nexus-staging-plugin:0.5.3
     \--- org.codehaus.groovy.modules.http-builder:http-builder:0.7.1
          +--- org.apache.httpcomponents:httpclient:4.2.1
          |    +--- org.apache.httpcomponents:httpcore:4.2.1
          |    +--- commons-logging:commons-logging:1.1.1
          |    \--- commons-codec:commons-codec:1.6
          +--- net.sf.json-lib:json-lib:2.3
          |    +--- commons-beanutils:commons-beanutils:1.8.0
          |    |    \--- commons-logging:commons-logging:1.1.1
          |    +--- commons-collections:commons-collections:3.2.1
          |    +--- commons-lang:commons-lang:2.4
          |    +--- commons-logging:commons-logging:1.1.1
          |    \--- net.sf.ezmorph:ezmorph:1.0.6
          |         \--- commons-lang:commons-lang:2.3 -> 2.4
          +--- net.sourceforge.nekohtml:nekohtml:1.9.16
          \--- xml-resolver:xml-resolver:1.2

(*) - dependencies omitted (listed previously)

BUILD SUCCESSFUL

Total time: 1.38 secs

Two plugins and a pack of transitive dependencies to gradle-nexus-staging-plugin thanks to http-builder (maybe it would be good to replace it with Jodd?).

Summary

It is worth to be able to distinguish standard projects dependencies and buildscript dependencies. The new buildEnvironment task helps to deal with the latter. This in turn becomes essential when strange runtime errors start to show up.

Tested with Gradle 2.10.

Picture credits: Zeroturnaround.

Have you ever experienced the “Could not find property X on plugin extension Y” error with a freshly cloned GitHub project you wanted to contribute to?

Missing username, password or token to a service you may have never heard of? It usually happens when you try to do anything (like just build a project) not only when a given plugin (like an online code coverage tool) is used. I didn’t like to have to modify my environment to just provide a small fix to another open source project. It was annoying me and I wanted to change it. Starting with Gradle 2.13 it became possible. However, let’s start with the reasons (if you are interested only in the solution please move forward to the last 2 paragraphs).

Gradle logo

Why do I get “Could not find property…”?

Most of Gradle plugins need to be configured. Some properties can be set directly in build.gradle, but some others (especially credentials) are better to keep locally in ~/.gradle/gradle.properties. As a result, a plugin configuration sections often look like this:

bintray {
    user = project.getProperty('bintrayUser')
    key = project.getProperty('bintrayKey')
    ...
}

or that:

bintray {
    user = getProperty('bintrayUser')
    key = getProperty('bintrayKey')
    ...
}

or even shorter:

bintray {
    user = bintrayUser
    key = bintrayKey
    ...
}

It works fine for a project developer having bintrayUser and bintrayKey defined in its local configuration, but for every person not uploading to Bintray on their daily basis it fails with:

* What went wrong:
A problem occurred evaluating root project 'another-nice-open-source-project'.
> Could not find property 'bintrayKey' on com.jfrog.bintray.gradle.BintrayExtension_Decorated@2ecc563.

The result is that project.getProperty(), not to mentioned explicit assignment, just throws exception when a particular property is not found. The bad is that the code is executed in the configuration phrase. For that reason the execution of every task, even not related to that particular plugin (like gw tasks or gw wrapper) fails miserably.

As a workaround a guard check has to be performed:

bintray {    //Gradle <2.13
    user = hasProperty('bintrayUser') ? getProperty('bintrayUser') : ''
    key = hasProperty('bintrayKey') ? getProperty('bintrayKey') : ''
    ...
}

It doesn’t look good very compact. As an another option a dummy placeholder could be kept in project configuration, but starting with Gradle 2.13 there is a better way to cope with that.

project.findProperty()

Gradle 2.13 is the first version with my contribution of the new method project.findProperty(). It behaves the same as getProperty(), but instead of throwing an exception the null value is returned. This simplifies the assignment greatly:

bintray {    //Gradle 2.13+
    user = findProperty('bintrayUser') ?: ''
    key = findProperty('bintrayKey') ?: ''
    ...
}

Some people could say that Optional could be better as a returned value, but this is an API and Gradle supports Java older than 8.

Summary

For me findProperty is a method I’ve been very often looking for in Gradle. I regret that it took me over the year to make this pull request. Gradle 2.13 has been just released and version upgrades across projects will be performed gradually. It can take some time, but every project migrating to 2.13 will be able to simplify its configuration making the “Could not find property X on plugin Y” error message a remembrance of the past (of course unless you really need to configure particular plugin to use it :) ).

Tested with Gradle 2.13.

How to communicate with Maven Central/Nexus without using the password kept locally unencrypted (especially with Gradle, but not limited to it).

Rationale

Unfortunately, Gradle (and many other build tools) does not provide any mechanism to locally keep passwords encrypted (or at least encoded). Without that even such a simple activity like showing your global Gradle configuration (~/.gradle/gradle.properties) to a colleague it uncomfortable, not to mention more serious risks associated with storing passwords on a disk in a plain-text form (see among others Sony Pictures Entertainment hack). It is Gradle, so with all Groovy magic under the hood it would be possible to implement an integration with a system keyring on Linux to fetch a password, but I’m not aware of any existing plugin/mechanism to do that and I would rather prefer not to write it.

Another issue is that nowadays, in the world of ubiquitous automation and cloud environments it is common to use API keys which allow to perform given operation(s). However, its lost doesn’t provide an attacker a possibility to hijack the account (e.g. token cannot be used neither to log into an administration panel nor to change of email or password which requires additional authentication).

It is very important if you need to keep valid credentials on a CI server to make automatic or even continuous releases. Thanks to my gradle-nexus-staging-plugin there is no need to do any manual steps in Nexus GUI to promote artifacts to Maven Central, so this was the next issue I wanted to deal with for my private and our FOSS projects in Codearte.

Nexus API key generation

Internet search for “maven central api key” wasn’t helpful, so I started digging into Nexus REST API documentation and I’ve found that in fact there is a (non widely known) way to generate and use an API key (aka an auth token).

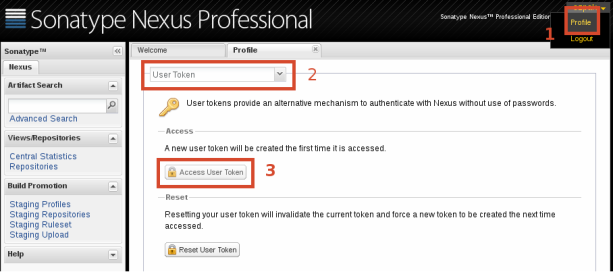
0. Log into Nexus hosting Sonatype OSS Repository Hosting (or your own instance of Nexus).
1. Click on your login name in right-upper corner and choose “Profile”.
2. From the drop-down list with “Summary” text select “User Token”.
3. Click “Access User Token”.

Generating API key in Nexus

Generating API key in Nexus

5. Enter your password
6. Copy and paste your API username and API key (into your ~/.gradle/gradle.properties file or a CI server configuration).
7. Work as usual with a little safer way.

Summary

It is good that using API keys is possible to deploy artifacts to Maven Central/Nexus and it is very easy to set it up. Someone could argue that the permission policy is coarse-grained (nothing or all operations except password/email change), but in my opinion it seems to be enough for the artifact repository system class. In addition, such an approach should work also with Sbt, Ivy, Leiningen and everything else that tries to upload artifacts into Maven Central (including Maven itself by removing limitations of the master password encryption with settings-security.xml). Hopefully, that post will make it widely known.

Quick tutorial how to promote/release artifacts in a Gradle project to Maven Central, without clicking in the Nexus GUI with Gradle Nexus Staging Plugin.

Introduction

Maven Central (aka The Central Repository) is (probably) the world’s largest set of open source artifacts used by Java and JVM-based projects. It was founded by the creators of Apache Maven and it has been serving artifacts since 2002. Nowadays there are some alternatives (listed below), but for many users Maven Central is still the primary source of project dependencies (and sometimes the only one whitelisted in the corporations).

The Central Repository logo

Problem

To perform the release to The Central Repository, Maven users can use Nexus Staging Maven Plugin – free, but not fully open source plugin. But with Gradle it was required to login into Nexus GUI and manually invoke two actions (close repository and release/promote repository). Quite boring and in addition highly problematic with the Continuous Delivery approach. Luckily Nexus exposes REST API which with some work allows to do the same. Gradle Nexus Staging Plugin arose to do that job.

Quick start

Important. Please pay attention that the prerequisite is to have an active and configured account in Sonatype OSSRH (OSS Repository Hosting) as well as Gradle project configured to publish release artifacts to staging repository. If you don’t have it already please follow a separate section for Gradle in the official guide.

To setup automatic release/promotion in your project add gradle-nexus-staging-plugin to the buildscript dependencies in your build.gradle file for root project:

buildscript {
    repositories {
        mavenCentral()
    }
    dependencies {
        classpath "io.codearte.gradle.nexus:gradle-nexus-staging-plugin:0.5.1"
    }
}

Apply the plugin:

apply plugin: 'io.codearte.nexus-staging'

Configure it:

nexusStaging {
    packageGroup = "org.mycompany.myproject"
    stagingProfileId = "yourStagingProfileId" //when not defined will be got from server using "packageGroup"
}

After successful archives upload (with maven, maven-publish or nexus plugin) to Sonatype OSSRH call:

./gradlew closeRepository promoteRepository

to close staging repository and promote/release it and its artifacts. If a synchronization with Maven Central was enabled the artifacts should automatically appear into Maven Central within several minutes.

Details

The plugin provides two main task:

  • closeRepository – closes the open repository with uploaded artifacts. There should be just one open repository available in the staging profile (possible old/broken repositories can be dropped with Nexus GUI)
  • promoteRepository – promotes/releases closed repository (required to put artifacts to Maven Central)

And one additional:

  • getStagingProfile – gets and displays staging profile id for a given package group. This is a diagnostic task to get the value and put it into the configuration closure as stagingProfileId. To see the result it is required to call gradle with --info switch.

It has to be mentioned that calling Nexus REST API ends immediately, but the closing operation takes a moment, so to make it possible to call closeRepository promoteRepository together there is a built-in retry mechanism.

The plugin is “upload mechanism agnostic” and can be used together with maven, maven-plugin or nexus plugins.

For more details and configuration parameters see project webpage or the working example in the plugin’s own release configuration.

Alternatives to Maven Central?

There is much younger, but promising alternative – Bintray which also allows to serve artifacts. It is free for open source projects and I personally had used it for some other projects and even created an automatic release mechanism for Bintray, Travis and Gradle. It works ok, but to put artifacts also to Maven Central it is required to store a private key used for singing on their servers and in addition provide Nexus credentials. It increases the risk to have them stolen and in Codearte we prefer to use private Jenkins instance to perform the release directly to Maven Central.

Summary

With Gradle Nexus Staging Plugin the whole release process to Maven Central can be performed with Gradle from a command line and with some additional work completely automatic from a CI server. No more buttons to push in Nexus GUI. In addition to Sonatype OSSRH the plugin can be also used with private Nexus instances with enabled staging repositories.

Btw, there possibly are many things that could be enhancement in the plugin. If you need something or found a bug feel free to use issue tracker to report that.

Thanks to Kuba Kubryński for motivation and help with analyzing the not very well documented Nexus REST API.

Update 20170904. The plugin is actively developed. Check the project webpage to read about new features added since version 0.5.1.

Quick tutorial how to configure Spock 1.0 with Groovy 2.4 using Maven and Gradle.

Spock 1.0 has been finally released. About new features and enhancements I already wrote two blog posts. One of the recent changes was a separation on artifacts designed for specific Groovy versions: 2.0, 2.2, 2.3 and 2.4 to minimize a chance to come across a binary incompatibility in runtime (in the past there were only versions for Groovy 1.8 and 2.0+). That was done suddenly and based on the messages on the mailing list it confused some people. After being twice asked to help properly configure two projects I decided to write a short post presenting how to configure Spock 1.0 with Groovy 2.4 in Maven and Gradle. It is also a great place to compare how much work is required to do it in those two very popular build systems.

Maven

Maven does not natively support other JVM languages (like Groovy or Scala). To use it in the Maven project it is required to use a third party plugin. For Groovy the best option seems to be GMavenPlus (a rewrite of no longer maintained GMaven plugin). An alternative is a plugin which allows to use Groovy-Eclipse compiler with Maven, but it is not using official groovyc and in the past there were problems with being up-to-date with the new releases/features of Groovy.

Sample configuration of GMavenPlus plugin could look like:

<plugin>
    <groupId>org.codehaus.gmavenplus</groupId>
    <artifactId>gmavenplus-plugin</artifactId>
    <version>1.4</version>
    <executions>
        <execution>
            <goals>
                <goal>compile</goal>
                <goal>testCompile</goal>
            </goals>
        </execution>
    </executions>
</plugin>

As we want to write tests in Spock which recommends to name files with Spec suffix (from specification) in addition it is required to tell Surefire to look for tests also in those files:

<plugin>
    <artifactId>maven-surefire-plugin</artifactId>
    <version>${surefire.version}</version>
    <configuration>
        <includes>
            <include>**/*Spec.java</include> <!-- Yes, .java extension -->
            <include>**/*Test.java</include> <!-- Just in case of having also "normal" JUnit tests -->
        </includes>
    </configuration>
</plugin>

Please notice that it is needed to include **/*Spec.java not **/*Spec.groovy to make it work.

Also dependencies have to be added:

    <dependencies>
        <dependency>
            <groupId>org.codehaus.groovy</groupId>
            <artifactId>groovy-all</artifactId>
            <version>2.4.1</version>
        </dependency>
        <dependency>
            <groupId>org.spockframework</groupId>
            <artifactId>spock-core</artifactId>
            <version>1.0-groovy-2.4</version>
            <scope>test</scope>
        </dependency>
    </dependencies>

It is very important to take a proper version of Spock. For Groovy 2.4 version 1.0-groovy-2.4 is required. For Groovy 2.3 version 1.0-groovy-2.3. In case of mistake Spock protests with a clear error message:

Could not instantiate global transform class
org.spockframework.compiler.SpockTransform specified at
jar:file:/home/foo/.../spock-core-1.0-groovy-2.3.jar!/META-INF/services/org.codehaus.groovy.transform.ASTTransformation
because of exception
org.spockframework.util.IncompatibleGroovyVersionException:
The Spock compiler plugin cannot execute because Spock 1.0.0-groovy-2.3 is
not compatible with Groovy 2.4.0. For more information, see
http://versioninfo.spockframework.org

Together with other mandatory pom.xml elements the file size increased to over 50 lines of XML. Quite much just for Groovy and Spock. Let’s see how complicated it is in Gradle.

Gradle

Gradle has built-in support for Groovy and Scala. Without further ado Groovy plugin just has to be applied.

apply plugin: 'groovy'

Next the dependencies has to be added:

compile 'org.codehaus.groovy:groovy-all:2.4.1'
testCompile 'org.spockframework:spock-core:1.0-groovy-2.4'

and the information where Gradle should look for them:

repositories {
    mavenCentral()
}

Together with defining package group and version it took 15 lines of code in Groovy-based DSL.

Btw, in case of Gradle it is also very important to match Spock and Groovy version, e.g. Groovy 2.4.1 and Spock 1.0-groovy-2.4.

Summary

Thanks to embedded support for Groovy and compact DSL Gradle is preferred solution to start playing with Spock (and Groovy in general). Nevertheless if you prefer Apache Maven with a help of GMavenPlus (and XML) it is also possible to build project tested with Spock.

The minimal working project with Spock 1.0 and Groovy 2.4 configured in Maven and Gradle can be cloned from my GitHub.

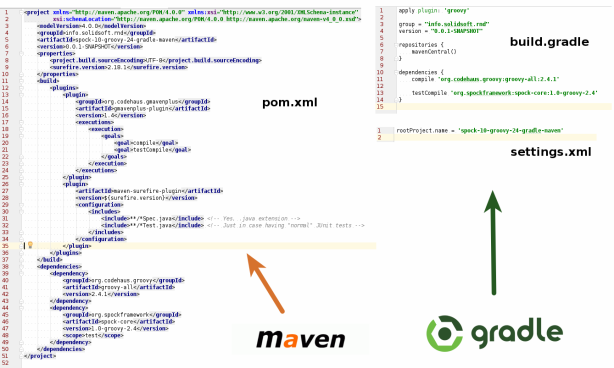
Graphical comparison of Spock and Groovy configuration in Maven and Gradle

Bonus: Graphical comparison of Spock and Groovy configuration in Maven and Gradle

Note. I haven’t been using Maven in my project for over 2 years (I prefer Gradle), so if there is a better/easier way to configure Groovy and Spock with Maven just let me know in the comments.

Note 2. The configuration examples assume that Groovy is used only for tests and the production code is written in Java. It is possible to mix Groovy and Java code together, but then the configuration is a little more complicated.

Note 3. If you are interested in get know useful tips and tricks about using Spock Framework to test your Java and Groovy code I will have a presentation about that at 4Developers conference, April 20th, 2015.

Update 20150310. Redesigned summary.

Leonard Nimoy 1931-2015

In my previous post I presented how to display and filter dependencies in multi-module Gradle build. This time I will show how to quickly discover why become a dependency of our project.

Problem

Real life use case. Multi-project Gradle build. In the runtime SLF4J reports problem with two discovered implementations: slf4j-logback and slf4j-simple. Logback is used in the project, but where slf4j-simple came from? Of course it is not listed in our build.gradle, but it is packaged into the WAR file and makes a conflict.

Long and bumpy way

With the knowledge from the previous post one of the possible solutions is to write allDeps task, dump dependencies to file and find a rogue dependency.

Not pretty visible tracking down dependency

It is not pretty visible on the first sight even for that small project with only 4 direct dependencies. But luckily there is a better way.

Quick solution

In addition to dependency task (implemented in DependencyReportTask), Gradle has one more similar task – dependencyInsight (implemented in DependencyInsightReportTask. It allows to limit a dependencies tree only to selected dependency (also transitive).

The command takes 2 mandatory parameters:
--configuration – Gradle configuration to search in – e.g. runtime or testRuntime (in a dependency task a configuration was optional to specify)
--dependency – dependency to look for – e.g. org.slf4j:slf4j-simple

In the mentioned project it could be:

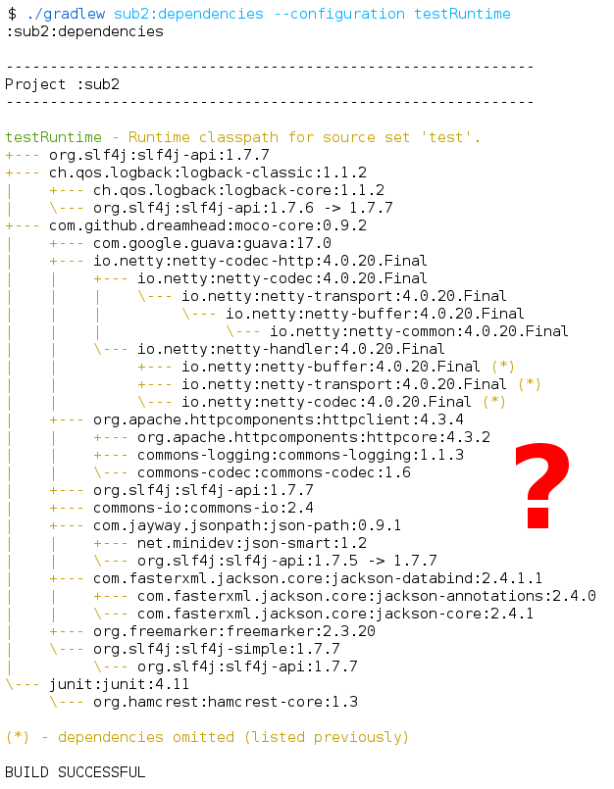
gradle sub2:dependencyInsight --configuration testRuntime --dependency slf4j-simple

Clear explaination why a dependency was included

The result is self explanatory. slf4j-simple is (unnecessary) included by Moco library (moco-core). With that knowledge it is easy to exclude that transitive dependency:

compile('com.github.dreamhead:moco-core:0.9.2') {
    exclude group: 'org.slf4j', module: 'slf4j-simple'
}

or when appropriate, do it globally for all configurations:

configurations {
    all*.exclude group: 'org.slf4j', module: 'slf4j-simple'
}

Further tuning

The nice thing is the ability to loosely define expected dependency features. All of the following are valid:

  • --dependency org.slf4j:slf4j-simple:1.7.7 – only exactly version of that dependency
  • --dependency org.slf4j:slf4j-simple – all versions of that dependency
  • --dependency org.slf4j – all dependencies in given group
  • --dependency slf4j-simple – all dependencies with given name regardless of the group (useful when a package was relocated)

Multiple subprojects

dependencyInsight the same as dependency task do not work with multiple subproject. Fortunately it is simple to create that task:

subprojects {
    task allDepInsight(type: DependencyInsightReportTask) << {}
}

It accepts all parameters supported by a base dependencyInsight task and:

gradle allDepInsight --configuration testRuntime --dependency org.slf4j:slf4j-simple

would do its job in all subprojects.

Summary

dependencyInsight task can be very useful when tracking down suspicious and not expected transitive dependencies in the project. An ability to make it multi-project build friendly makes it even more powerful.

Tested with Gradle 2.2.

Gradle logo

gradle dependencies allows to display dependencies in your project printed as pretty ascii tree. Unfortunately it does not work well for submodules in multi-project build. I was not able to find satisfactory solution on the web, so after worked out my own that blog post arose.

Multiple subprojects

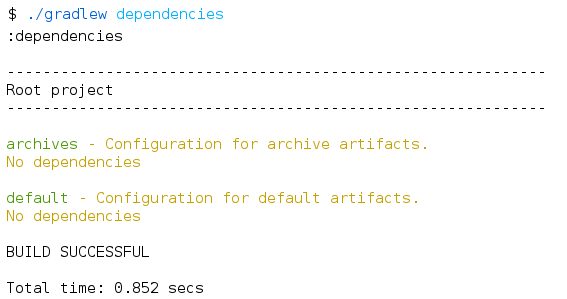
For multi-project builds gradle dependencies called in the root directory unexpectedly displays no dependencies:

No dependencies displayed for the root project

No dependencies displayed for the root project

In fact Gradle is right. Root project usually has no code and no compile or runtime dependencies. Only in case of using plugins there could be some additional configurations created by them.

You could think about --recursive or --with-submodules flags, but they do not exist. It is possible to display dependencies for subprojects with “gradle sub1:dependencies” and “gradle sub2:dependencies“, but this is very manual and unpractical for more than a few modules. We could write a shell script, but having regard to (potential) recursive folders traversal there are some catches. Gradle claims to be very extensible with its Groovy based DSL, so why not take advantage of that. Iteration over subprojects can give some effects, but after testing a few conception I ended with pure and simple:

subprojects {
    task allDeps(type: DependencyReportTask) {}
}

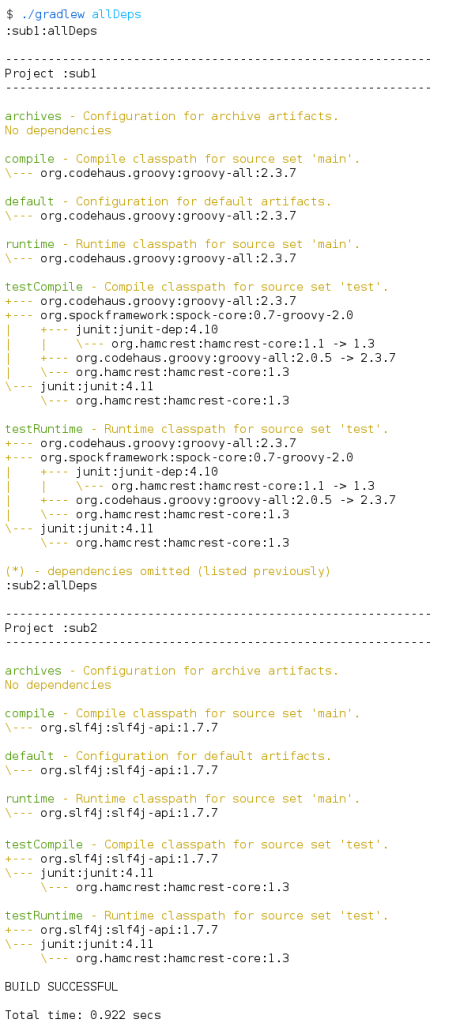
When called gradle allDeps it executes dependencies task on all subprojects.

Dependencies for all subprojects

Dependencies for all subprojects

Remove duplication

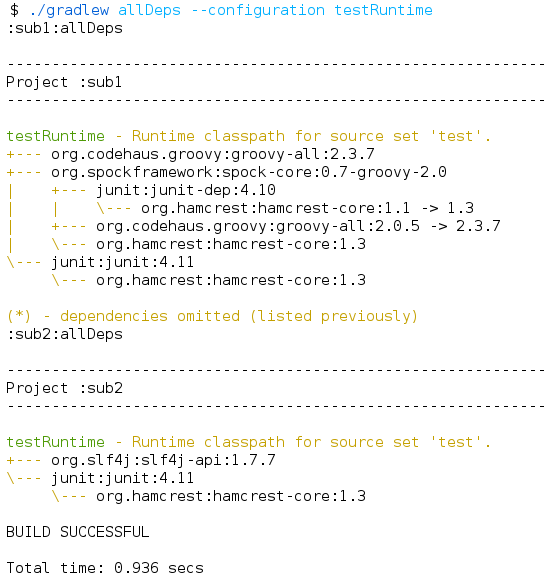
All dependencies belong to us, but some parts of the tree looks similar (and duplication is a bad thing). Especially configurations default, compile and runtime and the second group testCompile and testRuntime in most cases contain (almost) the same set of dependencies. To make the output shorter we could limit it to runtime (or in case of test dependencies testRuntime). dependencies task provides convenient parameter --configuration and to focus on test dependencies “gradle allDeps --configuration testRuntime” can be used.

Dependencies in one configuration for all subprojects

Dependencies in one configuration for all subprojects

Summary

Where it could be useful? Recently I was pair programming with my old-new colleague in a new project (with dozens submodules) where SLF4J in addition to expected slf4j-logback provider discovered on a classpath also slf4j-simple. We wanted to figure out which library depends on it. Logging dependencies tree to file with a help of grep gave us the answer.

As a bonus during my fights with DependencyReportTask I found an easier way how get know who requires given library. I will write about it in my next post.

Tested with Gradle 2.2.

Gradle logo