Posts Tagged ‘mockito’

Learn how leverage Spock 1.2 to slice a Spring context of a legacy application writing integration tests.

IMPORTANT. This blog site has been archived. You may read an updated version of this post here.
Visit https://blog.solidsoft.pl/ to follow my new articles.

Have you ever wanted, having some legacy application which you were starting to work on, to write some tests to get know what is going on and possibly be notified about regressions? That feeling when you want to instantiate a single class and it fails with NullPointerException. 6 replaced (with difficulty) dependencies later there are still some errors from the classes that you haven’t heard about before. Sounds familiar?

There are different techniques to deal with hidden dependencies. There is the whole dedicated book about that (and probably a few other that I haven’t read). Occasionally, it may be feasible to start with the integration tests and run through some process. It may be even more “entertaining” to see what exotic components are required to just setup the context, even if they are completely not needed in our case. Thank you (too wide and carelessly used) @ComponentScan :).

Injecting stubs/mocks inside the test context is a way to go as an emergency assistance (see the last paragraph, there are better, yet harder approaches). It can be achieved “manually” with an extra bean definition with the @Primary annotation (usually a reason to think twice before doing that) for every dependency at which level we want to make a cut of (or for every unneeded bean which is instantiated by the way). @MockBean placed on a field in a test is more handy, but still, it is needed to define a field in our tests and put the annotation on it (5? 10? 15 beans?). Spock 1.2 introduces somehow less know feature which may be useful here – @StubBeans.
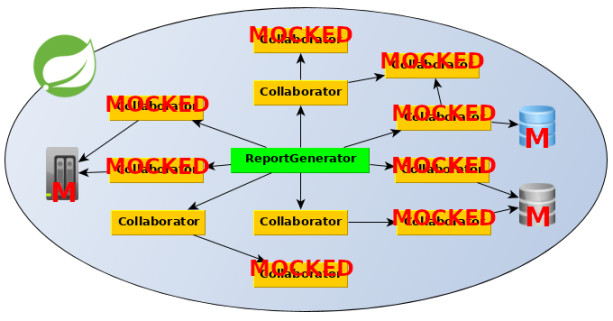
Mockied dependencies Spring context

It can be used to simply provide a list of classes which (possible) instances should be replaced with stubs in the Spring test context. Of course before the real objects are being instantiated (to prevent for example NPE in a constructor). Thanks to that up to several lines of stubbing/mock injections:

@RunWith(SpringRunner.class) //Spring Boot + Mockito
@SpringBootTest //possibly some Spring configuration with @ComponentScan is imported in this legacy application
public class BasicPathReportGeneratorInLegacyApplicationITTest { //usual approach

    @MockBean
    private KafkaClient kafkaClientMock;

    @MockBean
    private FancySelfieEnhancer fancySelfieEnhancerMock;

    @MockBean
    private FastTwitterSubscriber fastTwitterSubscriberMock;

    @MockBean
    private WaterCoolerWaterLevelAterter waterCoolerWaterLevelAterterMock;

    @MockBean
    private NsaSilentNotifier nsaSilentNotifierMock;

    //a few more - remember, this is legacy application, genuine since 1999 ;)
    //...

    @Autowired
    private ReportGenerator reportGenerator;

    @Test
    public void shouldGenerateEmptyReportForEmptyInputData() {
        ...
    }
}

can be replaced with just one (long) line:

@SpringBootTest //possibly some Spring configuration with @ComponentScan is imported in this legacy application
@StubBeans([KafkaClient, FancySelfieEnhancer, FastTwitterSubscriber, WaterCoolerWaterLevelAterter, NsaSilentNotifier/(, ... */])
  //all classes of real beans which should be replaced with stubs
class BasicPathReportGeneratorInLegacyApplicationITSpec extends Specification {

    @Autowired
    private ReportGenerator reportGenerator

    def "should generate empty report for empty input data"() {
        ....
    }
}

(tested with Spock 1.2-RC2)

It’s worth to mention that @StubBeans is intended just to provide placeholders. In a situation it is required to provide stubbing and/or an invocation verification @SpringBean or @SpringSpy (also introduced in Spock 1.2) are better. I wrote more about it in my previous blog post.

There is one important aspect to emphasize. @StubBeans are handy to be used in a situation when we have some “legacy” project and want to start writing integration regression tests quickly to see the results. However, as a colleague of mine Darek Kaczyński brightly summarized, blindly replacing beans which “explode” in tests is just “sweeping problems under carpet”. After the initial phase, when we are starting to understand what is going on, it is a good moment to rethink the way the context – both in production and in tests – is created. The already mentioned too wide @ComponentScan is very often the root of all evil. An ability to setup a partial context and put it together (if needed) is a good place to start. Using @Profile or conditional beans are the very powerful mechanisms in tests (and not only there). @TestConfiguration and proper bean selection to improve context caching are something worth to keep in your mind. However, I started this article to present the new mechanism in Spock which might be useful in some cases and I want to keep it short. There could be an another, more generic blog post just about managing the Spring context in the integration tests. I have to seriously thing about it :).

Starting with the version 2.17.0 Mockito provides the official (built-in) support for managing a mocking life cycle if JUnit 5 is used.

IMPORTANT. This blog site has been archived. You may read an updated version of this post here.
Visit https://blog.solidsoft.pl/ to follow my new articles.

mockito-junit5-logo

Getting started

To take advantage of the integration, the Mockito’s mockito-junit-jupiter dependency is required to be added next to the JUnit 5’s junit-platform-engine one (see below for details).

After that, the new Mockito extension MockitoExtension for JUnit 5 has to be enabled. And that’s enough. All the Mockito annotation should automatically start to work.

import org.junit.jupiter.api.Test;  //do not confuse with 'org.junit.Test'!
//other imports
import org.mockito.junit.jupiter.MockitoExtension;

@ExtendWith(MockitoExtension.class)
class SpaceShipJUnit5Test {

    @InjectMocks
    private SpaceShip spaceShip;

    @Mock
    private TacticalStation tacticalStation;

    @Mock
    private OperationsStation operationsStation;

    @Test
    void shouldInjectMocks() {
        assertThat(spaceShip).isNotNull();
        assertThat(tacticalStation).isNotNull();
        assertThat(operationsStation).isNotNull();
        assertThat(spaceShip.getTacticalStation()).isSameAs(tacticalStation);
        assertThat(spaceShip.getOperationsStation()).isSameAs(operationsStation);
    }
}

It’s nice that both a test class and test methods don’t need to be public anymore.

Please note. Having also JUnit 4 on a classpath (e.g. via junit-vintage-engine) for the “legacy” part of tests it is important to do not confuse org.junit.jupiter.api.Test with the old one org.junit.Test. It will not work.

Stubbing and verification

If for some reasons you are not a fan of AssertJ (although, I encourage you to at least give it a try) JUnit 5 provides a native assertion assertThrows (which is very similar to assertThatThrownBy() from AssertJ). It provides a meaningful error message in a case of an assertion failure.

@Test
void shouldMockSomething() {
    //given
    willThrow(SelfCheckException.class).given(tacticalStation).doSelfCheck();   //void method "given..will" not "when..then" cannot be used
    //when
    Executable e = () -> spaceShip.doSelfCheck();
    //then
    assertThrows(SelfCheckException.class, e);
}

I were not myself if I would not mention here that leveraging support for default methods in interfaces available in AssertJ and mockito-java8 a lot of static imports can be made redundant.

@ExtendWith(MockitoExtension.class)
class SpaceShipJUnit5Test implements WithAssertions, WithBDDMockito {
    ...
}

Tweaking default behavior

It also worth to point our that using the JUnit 5 extension Mockito by default works in the “strict mode”. It means that – for example – unneeded stubbing will fail the test. While very often it is a code smell, there are some cases where that test construction is desired. To change the default behavior an @MockitoSettings annotation can be used.

@ExtendWith(MockitoExtension.class)
@MockitoSettings(strictness = Strictness.WARN)
class SpaceShipJUnitAdvTest implements WithAssertions, WithBDDMockito {
    ....
}

Dependencies

As I already mentioned, to start using it is required to add a Mockito’s mockito-junit-jupiter dependency next to a JUnit 5’s junit-platform-engine one. In a Gradle build it could look like:

dependencies {
    testCompile 'org.junit.vintage:junit-platform-engine:5.1.0'
    testCompile 'org.mockito:mockito-junit-jupiter:2.17.2'  //mockito-core is implicitly added

    testCompile 'org.junit.vintage:junit-vintage-engine:5.1.0'  //for JUnit 4.12 test execution, if needed
    testCompile 'org.assertj:assertj-core:3.9.1'    //if you like it (you should ;) )
}

Please note. Due to a bug with injecting mocks via constructor into final fields that I have found writing this blog post, it is recommended to use at least version 2.17.2 instead of 2.17.0. That “development” version is not available in the Maven Central and the extra Bintray repository has to be added.

repositories {
    mavenCentral()
    maven { url "https://dl.bintray.com/mockito/maven" }    //for development versions of Mockito
}

In addition, it would be a waste to do not use a brand new native support for JUnit 5 test execution in Gradle 4.6+.

test {
    useJUnitPlatform()
}

IntelliJ IDEA has provided JUnit support since 2016.2 (JUnit 5 Milestone 2 at that time). Eclipse Oxygen also seems to add support for JUnit 5 recently.

mockito-junit5-idea-results

Summary

It is really nice to have a native support for JUnit 5 in Mockito. Not getting ahead there is ongoing work to make it even better.
The feature has been implemented by Christian Schwarz and polished by Tim van der Lippe with great assist from a few other people.

The source code is available from GitHub.

Btw, are you wondering how JUnit 5 compares with Spock? I will be talking about that at GeeCON 2018.

Geecon logo

Tune up your JUnit test class template for Idea with the BDD-like syntax, Java 8 and the Mockito-AssertJ duo.

Topics covered in this article may seem trivial. However, from my trainer experience I know that (unfortunately) it is not a common practice. Therefore, I decided to write this short blog post to propagate them and to be able to refer to it in the future.

given-when-then-template

My favorite testing framework for Java (and Groovy) is Spock. However, its mocks are not suitable for some purpose and I still use Mockito in various places. In addition, I still conduct a lot of my testing training in a JUnit/Mockito/AssertJ variant for teams which already have a test suite in that stack and would like to improve their skills without changing the known technology. Therefore, as an interlude, this blog post about testing in the pure Java style and propose how to tune up your JUnit testing framework assuming that you are already using Mockito and AssertJ (you should give them a try in the other case).

This blog post consists of tree parts. Firstly, I propose a BDD-style section-based test structure to keep your test more consist and more readable. Next, I explain how simplify – using the AssertJ and Mockito – constructions with Java 8. Last, but not least, I show how to configure it in IntelliJ IDEA as a default JUnit test (class) template (which isn’t as trivial as it should).

Part 1. BDD-style sections

Well written unit tests should meet several requirements (but it is a topic for a separate post). One of the useful practices is a clear separation into 3 code blocks with precisely defined responsibility. You can read more on that topic in my previous blog post.

As a repetition just the core rules presented in a short form:

  • given – an object under test initialization + stubs/mocks creation, stubbing and injection
  • when – an operation to test in a given test
  • then – received result assertion + mocks verification (if needed)
@Test
public void shouldXXX() {
  //given
  ...
  //when
  ...
  //then
  ...
}

That separation helps to keep tests short and focused on just one responsibility to test (in the end it’s just an unit test).

In Spock those sections are mandatory (*) – without them a test will not even compile. In JUnit there are just comments. However, having them in place encourage people to use them instead of having one big block of mess inside (especially useful for newbies in a testing area).

Btw, the mentioned given-when-then convention is based on (is a subset of) a much wider Behavior-Driven Development concept. You may encounter a similar division on 3 code blocks named arrange-act-assert which in general is an equivalent.

Part 2. Java 8 for AssertJ and Mockito

One of the features of Java 8 is an ability to put default methods in an interface. That can be used to simplify of calling static methods which is prevalent in the testing frameworks such as AssertJ and Mockito. The idea is simple. A test class willing to use a given framework can implement a dedicated interface to “see” those methods as its own methods on code completion in an IDE (instead of static methods from external class which require giving a class name before or a static import). Under the hood those default methods just delegate execution to static methods. You can read more about it in my other blog post.

AssertJ natively supports those construction starting with version 3.0.0. Mockito 1.10 and 2.x are Java 6 compatible and therefore it is required to use a 3rd-party project – mockito-java8 (which should be integrated into Mockito 3 – once available).

To benefit from easier method completion in Idea it is enough to implement two interfaces:

import info.solidsoft.mockito.java8.api.WithBDDMockito;
import org.assertj.core.api.WithAssertions;

class SampleTest implements WithAssertions, WithBDDMockito {

}

Part 3. Default template in Idea

I’m a big enthusiast of omnipresent automation. Wouldn’t it be good to have both given-when-then sections and extra interfaces automatically in place in your test classes? Let’s eliminate those boring things from our life.

Test method

Changing a JUnit test method is easy. One of the possible ways is “CTRL-SHIFT-A -> File Template -> Code” and a modification of JUnit4 Test Method to:

@org.junit.Test
public void should${NAME}() {
  //given
  ${BODY}
  //when
  //then
}

To add a new test in an existing test class just press ALT-INSERT and select (or type) JUnit4 Test Method.

Test class

With the whole test class the situation is a little bit more complicated. Idea provides a way to edit existing templates, however, it is used only if a test is generated with CTRL-SHIFT-T from a production class. It’s not very handy with TDD where a test should be created first. It would be good to have a new position “New JUnit test class” next to “Java class” displayed if ALT-INSERT is pressed being in a package view in a test context. Unfortunately, to do that a new plugin would need to be written (a sample implementation for Spock). As a workaround we can define a regular file template which (as a limitation) will be accessible everywhere (e.g. even in a resource directory).

Do “CTRL-SHIFT-A -> File Template -> Files”, press INSERT, name template “JUnit with AssertJ and Mockito Test”, set extension to “java” and paste the following template:

package ${PACKAGE_NAME};

import info.solidsoft.mockito.java8.api.WithBDDMockito;
import org.assertj.core.api.WithAssertions;

#parse("File Header.java") 
public class ${NAME} implements WithAssertions, WithBDDMockito {

}

Showcase

We are already set. Let’s check how it can look in practice (click to enlarge the animation).

idea-test-templates-in-action

Summary

I hope I convinced you to tune your test template to improve readability of your tests and to safe several keystrokes per test. In that case, please spend 4 minutes right now to configure it in your Idea. Depending on a number of tests written it may start to pay off sooner than you expect :).

Btw, at the beginning of October I will be giving a presentation about new features in Mockito 2 at JDD in Kraków.

JDD logo

Self promotion. Would you like to improve your and your team testing skills and knowledge of Spock/JUnit/Mockito/AssertJ quickly and efficiently? I conduct a condensed (unit) testing training which you may find useful.

Create better defined, shorter and maintainable unit tests with given-when-then sections.

Recently, I’ve been writing rather about more advanced concepts related to automatic testing (mostly related to Spock). However, conducting my testing training I clearly see that very often knowledge of particular tools is not the main problem. Even with Spock it is possible to write bloated and hard-to-maintain test, breaking (or not being aware of) good practices related to writing unit tests. Therefore, I decided to write about more fundamental things to promote them and by the way have a ready to use material to reference when coaching less experienced colleagues.

Introduction

Well written unit tests should meet several requirements and it is a topic for the whole series. In this blog post I would like to present a quite mature concept of dividing an unit test on 3 separate blocks with a strictly defined function (which in turn is a subset of Behavior-driven Development).

given-when-then to the victory

Unit tests are usually focused on testing some specific behavior of a given unit (usually one given class). As opposed to acceptance tests performed via UI, it is cheap (fast) to setup a class to test (a class under test) from scratch in an every test with stubs/mocks as its collaborators. Therefore, performance should not be a problem.

Sample test

To demonstrate the rules I will use a small example. ShipDictionary is a class providing an ability to search space ships based on particular criteria (by a part of a name, a production year, etc.). That dictionary is powered (energized) by different indexes of ships (ships in service, withdrawn from service, in production, etc.). In that one particular test it is tested an ability to search ship by a part of its name.

private static final String ENTERPRISE_D = "USS Enterprise (NCC-1701-D)";

@Test
public void shouldFindOwnShipByName() {
    //given
    ShipDatabase shipDatabase = new ShipDatabase(ownShipIndex, enemyShipIndex);
    given(ownShipIndex.findByName("Enterprise")).willReturn(singletonList(ENTERPRISE_D));
    //when
    List foundShips = shipDatabase.findByName("Enterprise");
    //then
    assertThat(foundShips).contains(ENTERPRISE_D);
}

given-when-then

The good habit which exists in both Test-driven and Behavior-driven Development methodologies is ‘a priori’ knowledge what will be tested (asserted) in a particular test case. It could be done in a more formal way (e.g. scenarios written in Cucumber/Gherkin for acceptance tests) or in a free form (e.g. ad hoc noted points or just an idea of what should be tested next). With that knowledge it should be quite easy to determine three crucial things (being a separated sections) of which the whole test will consist.

given – preparation

In the first section – called given – of a unit test it is required to create a real object instance on which the tested operation will be performed. In focused unit tests there is only one class in which the logic to be tested is placed. In addition, other objects required to perform a test (named collaborators) should be initialized as stubs/mocks and properly stubbed (if needed). All collaborators have to be also injected into the object under test which usually is combined with that object creation (as a constructor injection should be a preferred technique of dependency injection).

//given
ShipDatabase shipDatabase = new ShipDatabase(ownShipIndex, enemyShipIndex);
given(ownShipIndex.findByName("Enterprise")).willReturn(singletonList(ENTERPRISE_D));

when – execution

In the when section an operation to be tested is performed. In our case it is a search request followed by result memorization in a variable for further assertion.

//when
List foundShips = shipDatabase.findByName("Enterprise");

In most cases it is good to have just one operation in that section. More elements may suggest an attempt to test more than one operation which (possibly) could be divided into more tests.

then – assertion

The responsibility of the final section – then – is mostly an assertion of the previously received result. It should be equal to the expected value.

//then
assertThat(foundShips).contains(ENTERPRISE_D);

In addition, it may be necessary to perform a verification of method executions on declared mocks. It should not be a common practice as an assertion on received value in most cases is enough to confirm that code being tested works as expected (according to set boundaries). Nevertheless, especially with testing void methods it is required to verify that a particular method was executed with anticipated arguments.

AAA aka 3A – an alternative syntax

As I’ve already mentioned, BDD is a much wider concept which is especially handy for writing functional/acceptance tests with requirements defined upfront, (often) in a non technical form. An alternative test division syntax (with very similar meaning for the sections) is arrange-act-assert often abbreviated to AAA or 3A. If you don’t use BDD at all and three A letters are easier to remember for you than GWT, it’s perfectly fine to use it to create the same high quality unit tests.

Tuning & optimization

The process of matching used tools and methodologies to ongoing process of skill acquisition (aka the Dreyfus model) has been nicely described in the book Pragmatic Thinking and Learning: Refactor Your Wetware. Of course, in many cases it may be handy to use a simplified variant of a test with a given section moved to a setup/init/before section or initialized inline. The same may apply to when and then sections which could be merged together (into an expect section, especially in parameterized tests). Having some experience and fluency in writing unit tests it is perfectly valid to use shorthand and optimizations (especially testing some non-trivial cases). As long as the whole team understand the convention and is able to remember about basic assumptions regarding writing good unit tests.

Summary

Based on my experience in software development and as a trainer I clearly see that dividing (unit) tests into sections makes them shorter and more readable, especially having less experienced people in the team. It’s simpler to fill 3 sections with concisely defined responsibility than figure out and write everything in the tests at once. In closing, particularly for people reading only the first and the last sections of the article, here are condensed rules to follow:

  • given – an object under test initialization + stubs/mocks creation, stubbing and injection
  • when – an operation to test in a given test
  • then – received result assertion + mocks verification (if needed)

P.S. It is good to have a test template set in your IDE to safe a number of keystrokes required to write every test.
P.S.S. I you found this article useful you can let me know to motivate me to write more about unit test basics in the future.

Picture credits: Tomas Sobek, Openclipart, https://openclipart.org/detail/242959/old-scroll

Self promotion. Would you like to improve your and your team testing skills and knowledge of Spock/JUnit/Mockito/AssertJ quickly and efficiently? I conduct a condensed (unit) testing training which you may find useful.

How to simplify Mockito usage by removing static imports in Java 8 based projects.

Rationale

Mockito API is based on static methods aggregated (mostly) in the (BDD)Mockito class followed by extremely fluent, chained method calls. Mock creation, stubbing and call verification can be initiated with mock/spy/given/then/verify static methods:

@Test
public void shouldVerifyMethodExecution() {
    //given
    TacticalStation tsSpy = BDDMockito.spy(TacticalStation.class);
    BDDMockito.willDoNothing().given(tsSpy).fireTorpedo(2);
    //when
    tsSpy.fireTorpedo(2);
    tsSpy.fireTorpedo(2);
    //then
    BDDMockito.then(tsSpy).should(BDDMockito.times(2)).fireTorpedo(2);
}

Quite verbose, but starting with Java 5 one can use static imports to simplify the code, but at the cost of additional static imports:

import static org.mockito.BDDMockito.then;
import static org.mockito.BDDMockito.willDoNothing;
import static org.mockito.BDDMockito.spy;
import static org.mockito.BDDMockito.times;
(...)

@Test
public void shouldVerifyMethodExecution() {
    //given
    TacticalStation tsSpy = spy(TacticalStation.class);
    willDoNothing().given(tsSpy).fireTorpedo(2);
    //when
    tsSpy.fireTorpedo(2);
    tsSpy.fireTorpedo(2);
    //then
    then(tsSpy).should(times(2)).fireTorpedo(2);
}

Imports can be hidden in IDE and usually do not disturb much. Nevertheless to be able to write just a method name (e.g. mock(TacticalStation.class)) without a class is it required to press ALT-ENTER (in IntelliJ IDEA) to add each static import on the first usage of a given method in a test class. The situation is even worse in Eclipse where it is required to earlier add BDDMockito to “Favorites” in “Content Assist” to make it suggested by IDE. Eclipse guys could say “you have to do it just once”, but as I experienced during my testing/TDD trainings it makes a Mockito learning (usage) curve a little bit steeper.

Of course there are some tricks like using star imports by default for Mockito classes to reduce number of required key strokes, but if you use Java 8 in your project (hopefully a majority of you) there is a simpler way to cope with it.

Static imports free approach

Mockito-Java8 2.0.0 (and its counterpart for Mockito 1.10.x – version 1.0.0) introduces a set of interfaces which provide all methods from Mockito API. By “implement” them in a test class all those methods become automatically directly accessible in written tests:

//no static imports needed!

public class SpaceShipTest implements WithBDDMockito {

    @Test
    public void shouldVerifyMethodExecution() {
        //given
        TacticalStation tsSpy = spy(TacticalStation.class);
        willDoNothing().given(tsSpy).fireTorpedo(2);
        //when
        tsSpy.fireTorpedo(2);
        tsSpy.fireTorpedo(2);
        //then
        then(tsSpy).should(times(2)).fireTorpedo(2);
    }
}

The code looks exactly like in the previous snippet, but there is not need to do any static import (besides a normal import of WithBDDMockito itself).

Under the hood the WithBDDMockito interface implementation is dead simple. All methods are default methods which just delegate to proper static method in BDDMockito class.

default <T> BDDMockito.BDDMyOngoingStubbing<T> given(T methodCall) {
    return BDDMockito.given(methodCall);
}

Flavors of Mockito

Mockito methods are provided by 3 base interfaces, being an entry points for given set of methods:
WithBDDMockito – stubbing/mocking API in BDD style (provides also classic API).
WithMockito – classic stubbing/mocking API
WithAdditionalMatchers – additional Mokcito matchers (basic account are included in With(BDD)Mockito)

Summary

Java 8 has opened the new opportunities how (test) code can be written in more compact and readable way. Static imports free Mockito code can simplify writing tests a little bit, but there is more feature already available in Mockito-Java8 and even more to be included in Mockito 3.0 (those for which Mockito internals have to be modified in a non backward compatible way). Too take more ideas how code/projects can be refactored to benefit from Java 8 you can see my short presentation “Java 8 brings power to testing!” (slides and video).

Mockito-Java8 2.0.0-beta (for Mockito >=2.0.22-beta) and 1.0.0-beta (for Mockito 1.10.x and earlier betas of Mockito 2) is available through Maven Central. The versions should be pretty stable, but I would like to get wider feedback about this new feature, so it is labeled as beta. More details can be found on the project webpage.

Acknowledge. The idea was originally proposed by David Gageot (the guy behind Infinitest) in one of his blog posts.

Mockito logo

Mockito-Java8 is a set of Mockito add-ons leveraging Java 8 and lambda expressions to make mocking with Mockito even more compact.

At the beginning of 2015 I gave my flash talk Java 8 brings power to testing! at GeeCON TDD 2015 and DevConf.cz 2015. In my speech using 4 examples I showed how Java 8 – namely lambda expressions – can simplify testing tools and testing in general. One of those tools was Mokcito. To not let my PoC code die on slides and to make it simply available for others I have released a small project with two, useful in specified case, Java 8 add-ons for Mockito.

Mockito logo

Quick introduction

As a prerequisite, let’s assume we have the following data structure:

@Immutable
class ShipSearchCriteria {
    int minimumRange;
    int numberOfPhasers;
}

The library provides two add-ons:

Lambda matcher – allows to define matcher logic within a lambda expression.

given(ts.findNumberOfShipsInRangeByCriteria(
    argLambda(sc -> sc.getMinimumRange() > 1000))).willReturn(4);

Argument Captor – Java 8 edition – allows to use ArgumentCaptor in a one line (here with AssertJ):

verify(ts).findNumberOfShipsInRangeByCriteria(
    assertArg(sc -> assertThat(sc.getMinimumRange()).isLessThan(2000)));

Lambda matcher

With a help of the static method argLambda a lambda matcher instance is created which can be used to define matcher logic within a lambda expression (here for stubbing). It could be especially useful when working with complex classes pass as an argument.

@Test
public void shouldAllowToUseLambdaInStubbing() {
    //given
    given(ts.findNumberOfShipsInRangeByCriteria(
        argLambda(sc -> sc.getMinimumRange() > 1000))).willReturn(4);
    //expect
    assertThat(ts.findNumberOfShipsInRangeByCriteria(
        new ShipSearchCriteria(1500, 2))).isEqualTo(4);
    //expect
    assertThat(ts.findNumberOfShipsInRangeByCriteria(
        new ShipSearchCriteria(700, 2))).isEqualTo(0);
}

In comparison the same logic implemented with a custom Answer in Java 7:

@Test
public void stubbingWithCustomAsnwerShouldBeLonger() {  //old way
    //given
    given(ts.findNumberOfShipsInRangeByCriteria(any())).willAnswer(new Answer<Integer>() {
        @Override
        public Integer answer(InvocationOnMock invocation) throws Throwable {
            Object[] args = invocation.getArguments();
            ShipSearchCriteria criteria = (ShipSearchCriteria) args[0];
            if (criteria.getMinimumRange() > 1000) {
                return 4;
            } else {
                return 0;
            }
        }
    });
    //expect
    assertThat(ts.findNumberOfShipsInRangeByCriteria(
        new ShipSearchCriteria(1500, 2))).isEqualTo(4);
    //expect
    assertThat(ts.findNumberOfShipsInRangeByCriteria(
        new ShipSearchCriteria(700, 2))).isEqualTo(0);
}

Even Java 8 and less readable constructions don’t help too much:

@Test
public void stubbingWithCustomAsnwerShouldBeLongerEvenAsLambda() {  //old way
    //given
    given(ts.findNumberOfShipsInRangeByCriteria(any())).willAnswer(invocation -> {
        ShipSearchCriteria criteria = (ShipSearchCriteria) invocation.getArguments()[0];
        return criteria.getMinimumRange() > 1000 ? 4 : 0;
    });
    //expect
    assertThat(ts.findNumberOfShipsInRangeByCriteria(
        new ShipSearchCriteria(1500, 2))).isEqualTo(4);
    //expect
    assertThat(ts.findNumberOfShipsInRangeByCriteria(
        new ShipSearchCriteria(700, 2))).isEqualTo(0);
}

Argument Captor – Java 8 edition

A static method assertArg creates an argument matcher which implementation internally uses ArgumentMatcher with an assertion provided in a lambda expression. The example below uses AssertJ to provide meaningful error message, but any assertions (like native from TestNG or JUnit) could be used (if really needed). This allows to have inlined ArgumentCaptor:

@Test
public void shouldAllowToUseAssertionInLambda() {
    //when
    ts.findNumberOfShipsInRangeByCriteria(searchCriteria);
    //then
    verify(ts).findNumberOfShipsInRangeByCriteria(
        assertArg(sc -> assertThat(sc.getMinimumRange()).isLessThan(2000)));
}

In comparison to 3 lines in the classic way:

@Test
public void shouldAllowToUseArgumentCaptorInClassicWay() {  //old way
    //when
    ts.findNumberOfShipsInRangeByCriteria(searchCriteria);
    //then
    ArgumentCaptor<ShipSearchCriteria> captor = 
        ArgumentCaptor.forClass(ShipSearchCriteria.class);
    verify(ts).findNumberOfShipsInRangeByCriteria(captor.capture());
    assertThat(captor.getValue().getMinimumRange()).isLessThan(2000);
}

Summary

The presented add-ons were created as PoC for my conference speech, but should be fully functional and potentially useful in the specific cases. To use it in your project it is enough to use Mockito 1.10.x or 2.0.x-beta, add mockito-java8 as a dependency and of course compile your project with Java 8+.

More details are available on the project webpage: https://github.com/szpak/mockito-java8

Update 20151217. You may be also interested in my new blog post about using Mockito wihtout static imports.

Mockito uses a lazy approach for stubbing and when a not stubbed method is called it returns a default value instead of throwing an exception (like EasyMock). This is very useful to not overspecify the test.

A default returned value depends on a return type of a stubbed method. For methods eturning collections we have an empty collection, for numbers – 0, for booleans false, for ordinary objects – null (in Mockito 2.0 the set of not null values will be extended – this can be also achieved with 1.9.x and ReturnsMoreEmptyValues answer).

Mockito logo

Before we go any further a quick introduction do Answers (you can skip to the next paragraph if Answers are for you like an open book). In addition to simple stubbing based on desired value passed to Mockito directly:

given(tacticalStationMock.getNumberOfTubes())
    .willReturn(TEST_NUMBER_OF_TORPEDO_TUBES);

or for consecutive calls:

given(tacticalStationMock.getNumberOfEnemyShipsInRange()).willReturn(2, 3);

the stubbing API provides a way to pass an object with the logic to determine what should be returned in given case (based on method arguments or even an internal state (for consecutive calls)). A simple practical example returning always the first parameter passed to the called method:

public class ReturnFirstArgumentAnswer implements Answer<Object> {
    @Override
    public Object answer(InvocationOnMock invocation) throws Throwable {
        Object[] arguments = invocation.getArguments();
        if (arguments.length == 0) {
            throw new MockitoException("...");
        }
        return arguments[0];
    }
}

A sample usage when stubbing:

given(mock.methodToStub("arg1", "arg2"))
    .willReturn(new ReturnFirstArgumentAnswer());

Mockito provides a set of build-in answers. Some of them (like ThrowsException or CallRealMethods) are used by Mockito internally, but some others (like ReturnsArgumentAt introduced in 1.9.5) can be also useful for developers writing tests.

Let’s return to the main topic. Sometimes it is useful to change those default values. In addition to using the answer mechanism for stubbing a specific method calls Mockito provides a way to specify an answer which will be used for every not stubbed method execution on given mock. To do so we can use a static mock() method which in addition to a class to mock takes an additional parameter – a default answer.

mock(SpaceShip.class, Mockito.RETURNS_DEFAULTS);

As returns defaults is a default behavior in Mockito above code is just a more explicit version of:

mock(SpaceShip.class);

but we can use this construction to achieve a few interesting behaviors. One of the predefined answers provided by Mockito is RETURNS_DEEP_STUBS. It causes an automatic stubbing of chained methods calls and allows to do following:

SpaceShip spaceShipMock = mock(SpaceShip.class, Mockito.RETURNS_DEEP_STUBS);
given(spaceShipMock.getTacticalStation().getNumberOfTubes()).willReturn(5);

Please note that with default configuration it would cause NullPointerException due to the fact spaceShipMock.getTacticalStation() returns null. With RETURNS_DEEP_STUBS Mockito under the hood creates a mock for every middle method call. This is an equivalent of:

//NOTE. Deep stubs implemented manually - no more needed with RETURNS_DEEP_STUBS.
//See the previous example with an equivalent functionality in 2 lines.
SpaceShip spaceShipMock = mock(SpaceShip.class);
TacticalStation tacticalStationMock = mock(TacticalStation.class);
given(spaceShipMock.getTacticalStation()).willReturn(tacticalStationMock);
given(tacticalStationMock.getNumberOfTubes()).willReturn(5);

As a bonus, deep stubbing allows to perform a verification (only) on the last mock in the chain:

verify(spaceShipMock.getTacticalStation()).getNumberOfTubes();

Another provided answer is RETURNS_MOCKS. This tries to return default value using ReturnsMoreEmptyValues answer (an extended version of a default ReturnsEmptyValues), but if it fails a mock is returned. Only in the situation where the return type cannot be mocked (e.g. is final) null is returned.

mock(OperationsStation.class, Mockito.RETURNS_MOCKS);

Sometimes it can be useful to stub specified methods, but delegate remaining calls to the real implementations. It can be done with CALLS_REAL_METHODS. It can be useful for example when testing an abstract class (just the implemented methods without the need to subclass to create a concrete subclass).

mock(AbstractClass.class, Mockito.CALLS_REAL_METHODS);

Please note that using RETURN_DEEP_STUBS, RETURN_MOCKS and CALLS_REAL_METHODS should be not needed when dealing with well crafted code, written with the usage of Test-Driven Development. Nevertheless sometimes it is required to write tests for legacy code before a try to refactor it.

From a set of default answers defined in Mockito.java, there is also a very useful RETURNS_SMART_NULLS option. This returns SmartNull class instance instead of plain null, which provides a hint which mock stubbing was not performed correctly (and caused NPE). I wrote more about this mode some time ago in Beyond the Mockito Refcard #1.

In addition to define a default answer we can use any class which implements org.mockito.stubbing.Answer interface – both provided by Mockito or hand written. One more tip. In case you would like to use RETURNS_SMART_NULLS or ReturnsMoreEmptyValues globally for all mocks in your application you can check a trick with MockitoConfiguration.

Btw, in case you are starting an adventure with Mockito or want to learn more or just want to organize your knowledge you can be interested in my Mockito Refcard available for free from dzone.com.

Btw2, in addition if you are new to Mockito and live near Warszawa you can consider an attendance in my lecture/workshop about Mockito at Jinkubator – 18 II 2014 (next Tuesday).

Jinkubator

This post is the fourth part of the series Beyond the Mockito refcard extending released some time ago my Mockito reference card.

Mockito team provides two jars: mockito-core.jar and mockito-all.jar. Which is better to choose for Maven or Gradle-based project? Both of them can be downloaded manually from a project webpage and also are available in Maven Central Repository. In many Maven projects I have found that mockito-all.jar was used which isn’t the best option and I will shortly explain why.

mockito-all.jar besides Mockito itself contains also (as of 1.9.5) two dependencies: Hamcrest and Objenesis (let’s omit repackaged ASM and CGLIB for a moment). The reason was to have everything what is needed inside an one JAR to just put it on a classpath. It can look strange, but please remember than Mockito development started in times when pure Ant (without dependency management) was the most popular build system for Java projects and the all external JARs required by a project (i.e. our project’s dependencies and their dependencies) had to be downloaded manually and specified in a build script.

On the other hand mockito-core.jar is just Mockito classes (also with repackaged ASM and CGLIB). When using it with Maven or Gradle required dependencies (Hamcrest and Objenesis) are managed by those tools (downloaded automatically and put on a test classpath). It allows to override used versions (for example if our projects uses never, but backward compatible version), but what is more important those dependencies are not hidden inside mockito-all.jar what allows to detected possible version incompatibility with dependency analyze tools. This is much better solution when dependency managed tool is used in a project.

I asked to forget about ASM and CGLIB for a while. It is time to explain why. As classes from those projects are repackaged inside a Mockito JAR (i.e. put into different packages than the original ones) and they are treated by a class loader just as different classes. This means that from a dependency management point of view they are just another Mockito internal classes. The Mockito developers explain it as a way to avoid some not fixed problems with CGLIB and a class loader met in the early development phase.

This post is the third part of the series Beyond the Mockito refcard extending recently released my Mockito reference card.

Unit tests are very handy. They run fast and it is possible to execute hundreds or even thousands of them very often during development (especially useful when using TDD). Nevertheless from time to time we want to test the correctness of a part of an IoC container configuration and check how those components works together when managed by an IoC context. In this tutorial I will show how to do it in a convenient way.

The easiest solution could be to set up the whole “production” IoC context. Unfortunately depending on the size of a project it can take some time (long minutes) and in addition that configuration is likely to connect to external resources like a database or a message queue which makes restriction where those tests will be able to run. What can we do to fix it?

Very often to test interactions between selected components it is not needed to make the full featured integration tests. We can use two useful techniques together: limiting context scope (?) and mocking. The idea is to set up only needed components. This can be achieved by separate a minimal Spring configuration file using in tests (possible reusing some of existing production files). However very often there is a problem with direct dependencies which behaviors (?) are not needed in our tests, but are required to set up our beans. Doesn’t it look familiar to the situation meet also in unit tests? Mocks (and Mockito) to the rescue.

Our mocks have to be put into Spring context to be able to inject into other beans created by Spring. While it can be done using pure Spring mechanisms, there is a library which makes it much easier – Springockito written by Jakub Janczak.

Note. Pure unit tests are generally much better choice. Tests using IoC context should be only used when we really need to test behaviors within a context.

To start working with Springockito it is required to add its JAR to the project dependencies. Using Maven it could be:

<dependency>
    <groupId>org.kubek2k</groupId>
    <artifactId>springockito</artifactId>
    <version>1.0.4</version>
    <scope>test</scope>
</dependency>

With Gradle:

testCompile "org.kubek2k:springockito:1.0.4"

(change 1.0.4 to the latest released version of Springockito)

Note. The following examples are simplified to does not introduce unneeded distractions. They do not have a context configuration which is worth to test and it would be easier to use pure unit tests (without a Spring context).

Let’s take following configuration where plantWaterer object requires waterSource and waterScheduler beans:

<?xml version="1.0" encoding="UTF-8"?>
<beans xmlns="http://www.springframework.org/schema/beans"
    xmlns:xsi="http://www.w3.org/2001/XMLSchema-instance"
    xsi:schemaLocation="http://www.springframework.org/schema/beans http://www.springframework.org/schema/beans/spring-beans-3.0.xsd">

    <bean id="plantWaterer" class="info.solidsoft.refcard.mockito.PlantWaterer">
        <constructor-arg name="waterSource" ref="waterSource"/>
        <constructor-arg name="waterScheduler" ref="waterScheduler"/>
    </bean>

    <bean id="waterSource" class="info.solidsoft.refcard.mockito.RiverWaterSource">
        <constructor-arg ref="smallRiver"/>
    </bean>

    <bean id="waterScheduler" class="info.solidsoft.refcard.mockito.WaterScheduler"/>

</beans>

RiverWaterSource relies on an external resource which could be problematic during tests. To override it following configuration (with the additional namespace mockito) could be used.

<?xml version="1.0" encoding="UTF-8"?>
<beans xmlns="http://www.springframework.org/schema/beans"
    xmlns:xsi="http://www.w3.org/2001/XMLSchema-instance"
    xmlns:mockito="http://www.mockito.org/spring/mockito"
    xsi:schemaLocation="http://www.springframework.org/schema/beans http://www.springframework.org/schema/beans/spring-beans-3.0.xsd
                        http://www.mockito.org/spring/mockito https://bitbucket.org/kubek2k/springockito/raw/tip/springockito/src/main/resources/spring/mockito.xsd">

    <mockito:mock id="waterSource" class="info.solidsoft.refcard.mockito.WaterSource"/>

</beans>

Make a note that there is even no try to create the original bean. This is very useful in a situation where for example DAO would like to make a connection to a database during start up (which could take some time and is very fragile).

With Springockito it is also very easy to make a spy of existing Spring bean and inject it into another bean instead of the original bean for example to verify made interactions.

<?xml version="1.0" encoding="UTF-8"?>
<beans xmlns="http://www.springframework.org/schema/beans"
    xmlns:xsi="http://www.w3.org/2001/XMLSchema-instance"
    xmlns:mockito="http://www.mockito.org/spring/mockito"
    xsi:schemaLocation="http://www.springframework.org/schema/beans http://www.springframework.org/schema/beans/spring-beans-3.0.xsd
                        http://www.mockito.org/spring/mockito https://bitbucket.org/kubek2k/springockito/raw/tip/springockito/src/main/resources/spring/mockito.xsd">

    <mockito:spy beanName="waterSource"/>

</beans>

Mocks and spies created with a help of Springockito are just like “normal” mocks/spies which can be stubbed and verified. However there are two important differences. The instance of a mock/spy is created by Spring when a context is set up (in opposite to manual call Mockito.mock/spy() or using @Mock/@Spy annotation), so the easiest way to obtain it is to make an injection into our tests class (by name or by type).

@ContextConfiguration({<<configuration-files>>})
public class MockInjectionSpringockitoTest extends AbstractTestNGSpringContextTests {

    @Autowired
    private PlantWaterer plantWaterer;

    @Autowired	//it is safe - Springockito hid the original WaterSource bean
    private WaterSource waterSourceSpy;

    @Test
    public void shouldSpyInjectedObject() {
        //given - mocks/spies are already created, can be stubbed here

        //when
        plantWaterer.waterPlants();

        //then
        verify(waterSourceSpy).startWaterFlow();
    }
}

The seconds important difference is also related to the fact that a mock/spy is created with a context and the same instance is hold until the context shutdown. It can span across many tests or even test classes. It is important to properly reset/initialize mocks/spies manually before every test to avoid an impact of the operations done in previously executed tests. The issue has been already reported and hopefully will be resolved in the further Springockito versions.

Btw, in case of the following error:

org.springframework.beans.factory.parsing.BeanDefinitionParsingException: Configuration problem: Unable to locate Spring NamespaceHandler for XML schema namespace [http://www.mockito.org/spring/mockito]
Offending resource: class path resource [yourSpringConfig.xml]
	at org.springframework.beans.factory.parsing.FailFastProblemReporter.error(FailFastProblemReporter.java:68)
	at org.springframework.beans.factory.parsing.ReaderContext.error(ReaderContext.java:85)
(...)

make sure the Springockito JAR has been successfully added as a project dependency.

In case you prefer annotations over XML Springockito has also something for you. This is a version of Springockito which allow to do similar things, but directly in your test code.

To use it in a project it is required to add an springockito-annatations.jar to your project dependencies.

With Maven:

<dependency>
    <groupId>org.kubek2k</groupId>
    <artifactId>springockito-annotations</artifactId>
    <version>1.0.2</version>
</dependency>

With Gradle:

testCompile "org.kubek2k:springockito-annotations:1.0.2"

(change 1.0.2 to the latest released version of springockito-annotation – the numeration is not synchronized with springockito – it is an independent jar (as of 1.0.2))

@ContextConfiguration(loader = SpringockitoContextLoader.class, locations = {<<the-base-configuration-file>>})
public class MockInjectionSpringockitoTest extends AbstractTestNGSpringContextTests {

    @Autowired
    private PlantWaterer plantWaterer;

    @WrapWithSpy
    @Autowired	//to inject a spy into this field to make a verification
    private WaterSource waterSource; //spy

    @ReplaceWithMock //just replace the original bean with a mock, will be null
                     //it won't be stubbed - no need to inject
    private WateringScheduler wateringScheduler; //mock

    @Test
    public void shouldSpyInjectedObject() {
        //given - mocks/spies are already created, can be stubbed here

        //when
        plantWaterer.waterPlants();

        //then
        verify(waterSource).startWaterFlow();
    }
}

The trick here is to use a custom Spring context loader which checks (by name) if there is any bean which should be replaced with a mock or wrapped with a spy.

The code above causes waterSource bean defined in a configuration file to be wrapped with a spy and wateringScheduler bean to be replaced with a mock (the original wateringScheduler bean will not be created at all). They are both injected into plantWaterer. @ReplaceWithMock and @WrapWithSpy annotations are used only by Springockito to detect which beans should be replaced/wrapped. To get an instance of a mock/spy (to stub it or verify behavior) it is needed to use also an appropriate annotation (@Autowired, @Resource or @Inject) – see waterSource in the previous listing.

There is a limitation which force to use the same field name as a bean which should be replaced/wrapped. It should be fixed in the future.

This post is the second part of the series Beyond the Mockito refcard extending recently released my Mockito reference card.

Some time ago I’ve got an idea to make a short document briefly presenting the most important Mockito features with the real life examples. It was targeted at people wanting to quickly learn more about Mockito framework and those who use Mockito from time to time and need a small example to recall a syntax of a given construction. The result of my work was recently released by DZone as the Mockito refcard. Six – ready to print – pages filled in with condensed knowledge, a lot of examples and practical advises.

Why? This is my another action to promote practices helping to write high quality code guided by tests. Besides it always takes me a while to introduce a mocking concept and Mockito itself to a new junior developer and it is quite repetitive job. Having a Mockito refcard I can give it to that person and later talk what he/she was learned and practice it during the pair programming sessions. Pure long-term time savings :).

As a supplement I also started a series of posts about Mockito, extending a refcard with the more advanced topics which did not fit into the base version.

I would like to take this opportunity to thank Paweł Lipiński who did a complete language review of a draft version and Brice Dutheil, Gordon Dickens and Tomek Kaczanowski for exchanging ideas how to make my refcard better. Krzysiek Jelski, Kamil Szymański, Marceli Kramarczuk and Kamil Żbikowski also contributed by reading a draft version and sending suggestions.