Posts Tagged ‘pit’

Get know how fast (or slow) mutation testing in fact is (based on tangible results from the real FOSS projects) and how can it be optimized (with real implementation in PIT, a tool for Java projects).

One of the questions I’ve got after my first presentation about mutation testing with PIT at DevConf.cz in Brno years ago was “how long would it take in my project?”. I wasn’t able to answer precisely. The execution time depends on multiple factors. Size of the project, number of tests, kind of tests (unit/integration), just to mention a few. There are also some optimization techniques which can speed up the analysis. To give you a roughly idea about that, I collected the results from a mutation testing session in two popular FOSS projects performed with PIT.

I assume that you already know something about mutation testing. If not, please read that article before going further.

The fast and the furious 1910

Warm-up

As my guinea pigs I chose two popular open source projects – Assertj – which provides “fluent assertions for Java” and Joda-Time providing “a quality replacement for the Java date and time classes” which was a must for Java projects before Java 8 where similar solution became available out-of-box.

AssertJ can be named a medium size project according to FOSS standards. It has ~85K lines of production code and 150K lines of tests (as measured by Idea statistics plugin – including empty lines and comments). The code compilation takes ~2 seconds. Test execution ~12 seconds (almost 10_000 (mostly) unit tests). Joda-Time is somehow smaller with ~70K LOC in production and ~72K LOC in tests. Test execution takes ~3 seconds (~4200 tests).

I chose AssertJ and Joda-Time as they have a very solid test harness which consists (mostly) of unit tests – the best possible kind of tests for most of the cases. While integration tests can also be used with mutation testing (with some limitations and side effects) unit tests are the perfect candidate.

Brute force

Based on the further PIT analysis I estimated a number of possible to generate mutants at 8000 for AssertJ and 10000 for Joda-time. Of course it depends on the number of mutations available in your tool belt, however, to compare a brute force method with PIT the same number of mutants is accurate.

You may ask why there is greater number of mutants generated for Joda-time which has smaller codebase. It would be a fair question. PIT (or any other mutation testing tool) generates mutants in the lines where something can be “broken”. As Joda-time contains more “real logic” inside it was possible to generate more mutants than in AssertJ code where is a lot of delegation. In the other words, it’s usually possible to generate more mutants generated in a line with an if statement than in a line which just calls some void method in an another class. Therefore, number of mutations does not depend only on the number of lines.

Let’s get back to our calculations. AssertJ, brute force algorithm. For every mutation code has to be compiled – 8000 * 2 seconds and all tests have to be executed 8000 * 12 seconds. It gives 112000 seconds in total. It is ~1867 minutes, over 31 hours! Even for 5 times smaller Joda-time it is still: 10000 * 1 seconds + 10000 * 3 = 40000 seconds -> 667 minutes -> over 11 hours!

Wow, over 11 and 31 hours. For not so large projects. It is one of the reasons why mutation testing – first proposed by Richard Lipton in 1971 (over 40 years ago!) – had been an academic technique only. Let’s take a look how it could be optimized to make it conform to the reality in enterprise projects.

Optimizations

Test selection

Running all tests for every mutation it greatly ineffective. One of the naive approaches is an usage of a name convention – tests usually are named SomeProductionClass*Test. However, it tends to underestimate test suite effectiveness as no all tests are written in that way (especially integration/acceptance ones) and there could be also some typos. Another idea is a static call analysis. It’s more reliable, however, it completely skips reflection calls and in addition it can have a problem with polymorphism.

PIT in turns, leverages some other techniques. First of all, tests are executed in a “normal” mode and a standard code coverage metric is gathered. Thanks to that procedure, mutants with no “standard” coverage can be skipped. There is no chance to have them killed – no test even executes that given line. That technique can be especially beneficial if PIT is used in a project having small number of automated tests (low standard code coverage). What is more, PIT knows exactly which tests execute the particular line. Therefore, no test will ever be run against a mutant that it will not execute. This is essential to limit the number of tests executed per mutant. As a bonus, PIT (based on the first execution) is aware of tests execution time. Tests covering a given mutant can be reordered to have fast ones executed first. If a mutant has been killed, the subsequent (slower) tests can be skipped.

Those optimizations (among other technical solutions – such as creating mutations at the bytecode level instead of the source code one – which is must faster, albeit harder in implementation and also has some limitations) contributed to much faster mutation testing analysis in comparison to theoretical brute force mode.

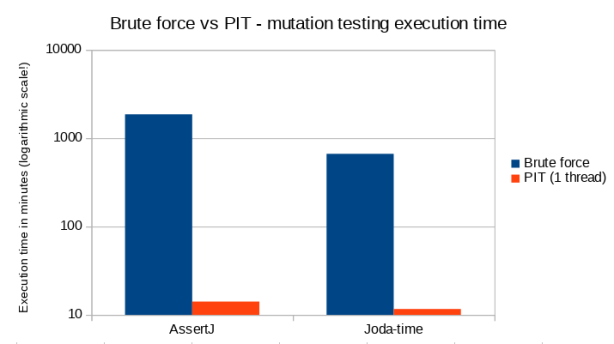
Let’s compare the theoretical brute force analysis time with the one achieved with vanilla PIT configuration.

Execution time in minutes Brute force PIT (1 thread)
AssertJ 1866.67 14.15
Joda-time 666.67 11.65

Brute force mutation analysis vs PIT

Looking at the chart please notice that Y-axis has a logarithmic scale (!). It’s ~14 minutes for AssertJ (as opposed to ~1867 minutes – over 31 hours) and ~11 minutes for Joda-time (compared to ~667 minutes – over 11 hours). It’s ~130 and ~60 times faster respectively. Looks good, but it can be done even better.

Parallel execution

One of the consequences of breaking the Moore’s law years ago was an increment of number of cores in modern CPUs. Nowadays, 4 or 8 virtual cores is a standard of a developer workstation. Servers can have much more of them. PIT advertised as “a state of the art in mutation testing” in addition to aforementioned optimizations supports parallel execution. Let’s take a look how much it can be gained in our tests case.

Test environment

All tests were performed using a dedicated m4.4xlarge AWS instance (32 virtual cores – 2x Intel(R) Xeon(R) CPU E5-2680 v2 @ 2.80GHz with 8 physical cores each – and 64GB RAM). Most of the executions were repeated to verify the achieved result, however, the methodology was far from one required in scientific researches (which was definitely not an aim of my work).

Raw results

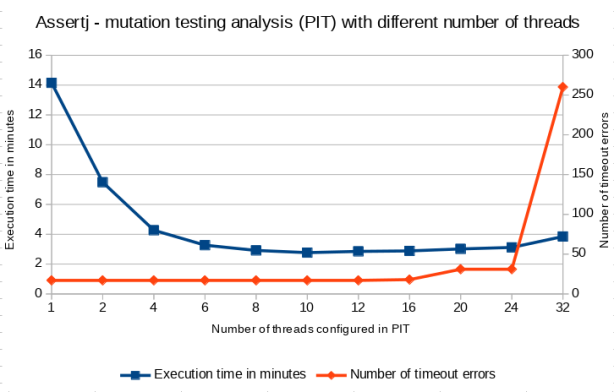
AssertJ
Number of threads 1 2 4 6 8 10 12 16 20 24 32
Execution time in minutes 14.15 7.48 4.27 3.27 2.92 2.77 2.85 2.88 3.02 3.12 3.85
Number of timeout errors 17 17 17 17 17 17 17 18 31 31 260

AssertJ - PIT analysis time

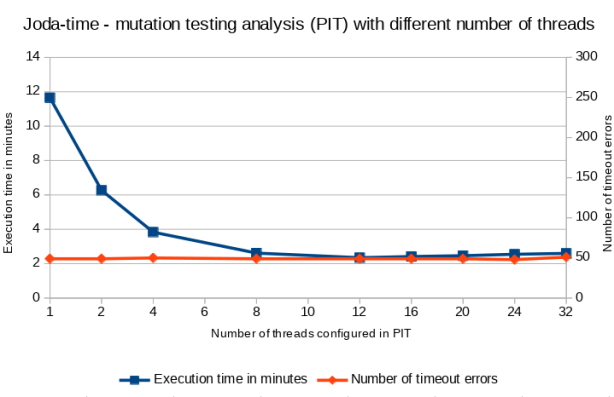
Joda-time
Number of threads 1 2 4 8 12 16 20 24 32
Execution time in minutes 11.65 6.27 3.83 2.62 2.35 2.42 2.47 2.55 2.60
Number of timeout errors 49 49 50 49 49 49 49 48 51

Joda-time - PIT analysis time

Commented results

The aforementioned results clearly shows that having quite powerful machine it was possible to the reduce mutation testing analysis execution time over 5 times (in comparison to sequential analysis) thanks to doing multiple things at the same time. In the test subjects the saturation point was placed around 10-12 threads (out of 32 virtual cores). At that state the machine seemed to be (almost) fully loaded (see the screenshot below) by most of the time (excluding the initial and the last stage of the analysis). After certain point the number of timeout errors was increased significantly (in a case of AssertJ) which could confirming that the machine was overloaded. Unfortunately, I don’t have a good explanation why the system was saturated much below 32 virtual cores (16 physical cores) as PIT should not use more threads as defined and there was no extra parallelism in the tests itself. As reasonably suggested by Henry Coles, the author of PIT, next time I will attach a profiler to the analysis to try to find potential places to speed the things up even further.

CPU utilisation - PIT, 12 threads

CPU utilisation – PIT, 12 threads

Further optimizations

Having mutation testing performed regularly in large codebase, the amount of changed code is usually meaningless. To not to have to re-execute mutation on all the code, PIT incorporates the incremental mode. When enabled, PIT determines which mutant could have got a chance to get killed by the recent changes in the production code and tests. As a result, the analysis scope can be limited to those classes. This approach is perfect for running a local analysis by a developer on his/her workstation or in a change/pull request to determine the “quality” of the recently introduced changes. For large codebase savings on time execution can be tremendously. It is only worth to remember that the heuristic selecting which part of the analysis should be executed has some limitation and from time to time it is good to run the full analysis anyway.

Summary

With a few smart optimizations (here implemented in PIT) it is possible to reduce (a theoretical) brute force mutation testing execution time by even ~130 times (from 31 hours to less than 15 minutes in a case of AssertJ). Having a hi-end quad core laptop it is possible to cut another chunk thanks to parallel execution. However, only the power of very strong server machine (here a server with 32 virtual cores which is not uncommon among CI server executors used in large projects) allows to unleash the power of PIT to speed up the mutation testing analysis. The full analysis time was possible to reduce by 3 orders of magnitude (!) (from 31 hours to less than 3 minutes in a case of AssertJ). It, together with incremental analysis, can make mutation testing feasible* to use on a daily basis in the real life, large enterprise projects (especially with unit tests posed the majority of the tests used in a project – but it is a topic for an another blog post :) ).

Btw, what is your experience in using mutation testing in non-academic projects? Leave your comment below.

Self promotion. Would you like to improve your and your team testing skills and knowledge of Spock/JUnit/Mockito/AssertJ/PIT quickly and efficiently? I conduct a condensed (unit) testing training which you may find useful.

Mutation testing allows to check the quality (effectiveness) of automatic tests. PIT (aka pitest) is a leading mutation testing tool for Java environment. In my last blog post about PIT in January 2013 I have covered version 0.29. Since then the PIT development team has been busy and the 4 releases introduced various new features (besides fixed bugs). In this post I will cover the most important (in my opinion) changes in the project (up to recently released version 0.33).

PIT mutation testing tool logo

New features

– preliminary support for Java 8 bytecode – PIT can be used with code which contains Java 8 syntax and constructions (including lamdas)
– internal refactoring resulted in much faster “standard” line coverage calculation
– support for parametrized JUnit tests written with Spock (in Groovy) and JUnitParams
– ability to define a coverage threshold (both line and mutation) below which the build will fail
– ability to use PIT with Robolectric
– new Remove Conditionals Mutator (a conditional statement will always be true – not enabled by default as of 0.33)
– new Remove Increments Mutator (an increment operation will be removed – not enabled by default as of 0.33)
– ability to choose JVM to be used for mutation testing
– ability to run PIT only for locally changed files for Maven build with configured SCM plugin
– demanding users can define their own strategies for: test selection, output format and test prioritization – PIT provides extension points which allow to write custom implementations
– partial support for JUnit categories
– support for mutating static initializers in TestNG

In the meantime there were also releases of plugins/tools based on PIT. My plugin for Gradle was enhanced with the dynamic task dependencies resolution (just “gradle pitest” takes care about all the requisites in the Gradle build lifecycle) and support for the additional main and test source sets. Plugin for Eclipse has got (inter alia) a new mutation view and an ability to run PIT against all the projects in a workspace.

Not only releases

Besides new releases PIT has got brand new Bootstrap based webpage, the logo (see above) and the source code was migrated from Mercurial on Google Code to GitHub. The nice thing is that the move resulted in a few contributions withing the first weeks.

Henry Coles the author of PIT also started the new commercial project FaultSeed – “better mutation testing tools for the JVM” which will be based on PIT and has a goal to be 50% faster than PIT and support also Groovy and Scala. Very promising.

PIT (and mutation testing in general) becomes more and more popular and recently there were given a number of talks about it (including my talk at Developer Conference 2014slides). The number of questions on the project’s mailing list also significantly increased. And you, have you tried PIT in your project yet?

DevConf.cz 2014 logo

The Happiness Door is a great method of collecting instant feedback. I have used it successfully on my training sessions and recently had a first try to use it after my conference speech. In this post I present my case study and the reasons why I will definitely use it on upcoming events.

Part 1. From the beginning. It becomes a tradition to end Warszawa JUG’s meeting seasons at the edge of June and July in a great style – with Confitura – the largest free conference about Java and JVM in Poland. This year the seventh edition was planned for about 1000 people and it took less than 2 days to sold out all the tickets (including overbooking). 5 parallel tracks with 35 presentations on various topics. From tuning JVM, different languages on JVM and a lot of frameworks though Java Script, Android, databases, architecture and testing to motivating people, Gordon Ramsay and company management in the 21th century. Too much to embrace during a day, but fortunately all presentations were recorded and will be available online.

My presentation was about mutation testing in Java environment with PIT. I wrote a few posts on that topic already. In a nutshell – a nice way to check how good your test really are. Writing testable code had wide representation at Confitura – I counted four more testing-related presentations.

Part 2. The Happiness Door method (if you new to this method read my previous post first). Before my presentation the sticky notes were distributed across the room and 5 smiley faces put on the door. At the begging I explained to the audience what was going on in this method and why their feedback was so important for me. Leaving the room about 50% attendees gave numerical feedback. Almost half of them had some comments (from “nice talk” to an essay placed on both sides of a sticky note :) ). Some of them were very interesting. Thanks!

I’m very happy I used this method on my speech. First time just minutes after a presentation I knew what people thought about it. In my case it was: “quite good, but there is still a field for improvement”.

The Happiness Door (one leaf) after my speech at Confitura 2013

The Happiness Door (one leaf) after my speech at Confitura 2013

Here is a good place to thank Małgorzata Majewska and Anna Zajączkowska who helped me polish many aspects of my speech.

The interesting thing is that when I have got an email from the organizers with the feedback collected using the online survey the average score was very similar, just got a month later, so why should I wait? With The Happiness Door method it is possible to get it know immediately (and even with the larger test sample).

Btw, it is not easy to prepare to the presentation (there were as always some problems with a projector) and put a sticky note on every place in the audience room (~150 seats) in 15 minutes. Thanks to Edmund Fliski and Dominika Biel for their help with a distribution.

Btw2, after the talk I had very interesting conversations with the people wanting to use mutation testing in their projects, the people already experimenting with PIT and Konrad Hałas – the guy from Warsaw who wrote MutPy – a mutation testing tool for Python.

Part 3. The slides from my speeches evolves over time. 2 years ago my slides were full of the bullet lists – the feedback – boring, to much text. Recently I had some internal presentation with less than 10 slides with no text, just images – the feedback – hard to follow, to little text. In the mean time I did an experimented with a presentation based on a mind map – mixed feedback. This time I combined images and text – some people liked it some not :). Be the judge. The slides (in Polish) are available for download.

Appendix. Thanks to Chris Rimmer for the idea of presenting IT topics using a metaphor to non IT events and people.

I hope I encouraged you to give The Happiness Door method a try. Please share your experience in comments.

P.S. Good news for all the people who missed my presentation at Confitura. My proposal was by accepted by The Program Committee and I will be speaking in Kraków at JDD 2013 (October 14-15th).

jdd13-speaker

The Happiness Door is a method of collecting immediate feedback I have read about some time ago on the Jurgen Appelo’s blog. I used it this year during my training sessions and it worked very well. I would like to popularize it a little bit.

This method requires to select a strategically located place (like the second leaf of the exit door) with marked scale (I use 5 smileys from a very sad to a very happy one) and ask people to put distributed sticky notes on a level corresponding to their satisfaction of the session. They are encouraged to add a concrete comment(s) explaining given score (like “boring” or “too little practical exercises”), but it is completely valid to just attach an empty card in the selected place. The mentioned issues could be discussed with the whole group to determine how the given thing could be improved best. I start getting feedback before a lunch break on the first training day and gently remind about it on every following break.

Feedback after my testing training

After my ‘Effective code testing’ training. (Almost) all attendies were pleased again :-).

Update 2015: I decreased a frequency of obligatory opining to twice a day (after a lunch break and at the end of a day) to save some trees and give the attendees more time to consider the things.

The main advantage of using this method is to get both instant numerical feedback (how much people like it) and concrete comments (what exactly do they (dis)like). The feedback is gathered very fast when there is still a room for improvements (in contrast to the more formal survey at the end of the training). I have got numerous comments from attenders that they like this method as well and I plan to use it also in my further sessions.

On my courses I even introduced a small enhancement to the original method. Every day I give away sticky notes in a different color. It allows to easily distinguish feedback given on a particular day and identify a trend. On the photos bellow for example it is pretty visible that after a feedback I got on the first day (yellow cards) I was able to adapt my training to the group’s level and expectations (blue cards).

Feedback after my training - day 1 - The Happiness Door method

Day 1 – a moderate result – the attendees didn’t get a training program in their company and expected something completely different…

Feedback after my training - day 2 - The Happiness Door method

Day 2 – a visible uptrend – I heavily diverged from the program to follow people’s expectations. Day 3 was even better :-)


This spring was quite busy for me as a trainer. I was a mentor at Git Kata – a free Git workshop, gave a talk about asynchronous calls testing on “6 tastes of testing – flashtalks” and recently did a short workshop about Mockito at Test Kata. In the meantime I conducted two 3-day training sessions about writing “good code” and plan one more Test Driven Development session at the end of June. Everything together with my main occupation – writing good software and help team members to do the same. What is more recently I’ve got very pleasant information that my presentation proposal about Mutation Testing was accepted and at the beginning of July I will close this training season speaking at Confitura 2013 (which nota bene was sold out (1200 tickets!) in less than 2 days). See you at Confitura.

Confitura 2013 - Speaker

Confitura 2013 – Speaker

Mutation testing can efficiently detect places in code which are insufficiently covered by tests. The price we have to pay for it is time – number of mutations has to be tested with a set of unit tests. This time is much longer than calculating a “normal” code coverage. The newest PIT 0.29 provides a long awaiting feature – incremental analysis. When enabled PIT will store results from the previous runs on disk and track changes in the code and tests to avoid rerunning analyses which result should stay the same.

To start using incremental analysis it is necessary set historyInputLocation and historyOutputLocation configuration properties. For example in Pitest Maven Plugin it could be:

<plugin>
    <groupId>org.pitest</groupId>
    <artifactId>pitest-maven</artifactId>
    <version>0.29</version>
    <configuration>
        <threads>4</threads>
        <historyInputLocation>target/pitHistory.txt</historyInputLocation>
        <historyOutputLocation>target/pitHistory.txt</historyOutputLocation>
    </configuration>
</plugin>

It is worth to notice that for a basic usage (i.e. run analysis from time to time) input and output history locations will point to the same file. Therefor in Gradle plugin for PIT 0.29.0 there was added an additional parameter enableDefaultIncrementalAnalysis which when enabled automatically set historyInputLocation and historyOutputLocation to build/pitHistory.txt simplifying a configuration.

buildscript {
    (...)
    dependencies {
        classpath 'info.solidsoft.gradle.pitest:gradle-pitest-plugin:0.29.0'
        classpath 'org.pitest:pitest:0.29'
    }
}

apply plugin: 'pitest'

pitest {
    targetClasses = ['our.base.package.*']
    threads = 4
    enableDefaultIncrementalAnalysis = true
}

There is a number of optimizations already implemented in PIT. The author warns of potential errors which can be introduced in that way into the analysis, but although being currently an experimental feature it can dramatically reduce calculation time especially when used on very large codebases.

Update 2013-04-13: Added missing line which applies plugin to a project. Thanks to Bruno de Carvalho for report the issue.

Looking for a way to use mutation testing and PIT with your Gradle-based project? Your search is over. Recently released gradle-pitest-plugin makes it possible in a very comfortable way.

In short the idea with mutation testing is to modify the production code (introduce mutations) which should change its behavior (produce different results) and cause unit tests to fail. The lack of the failure may indicate that given part of the production code was not covered good enough by the tests. To read more about mutation testing take a look on my previous post or PIT webpage directly.

To start using PIT add following configuration to a build.gradle file in your project:

buildscript {
    repositories {
        mavenLocal()
        mavenCentral()
        //Needed to use a plugin JAR uploaded to GitHub (not available in a Maven repository)
        add(new org.apache.ivy.plugins.resolver.URLResolver()) {
            name = 'GitHub'
            addArtifactPattern 'http://cloud.github.com/downloads/szpak/[module]/[module]-[revision].[ext]'
        }
    }
    dependencies {
        classpath 'info.solidsoft.gradle.pitest:gradle-pitest-plugin:0.28.0'
        classpath 'org.pitest:pitest:0.28'
    }
}

This will add required dependencies to a build script together with a proper repositories configuration.

The second thing is to configure plugin itself.

pitest {
    targetClasses = ['our.base.package.*']
    threads = 4
}

The only required parameter is “targetClasses” – a package containing a code which should be mutated (usually the base package for your project), but in case your tests are written in a thread safe manner I encourage your to give a “threads” parameter a try. It can decrease a time required for mutation analysis dramatically. gradle-pitest-plugin supports all reasonable parameters available in PIT.

Having everything configured running mutation testing is as easy as:

gradle pitest

After a while you should see PIT summary similar to:

================================================================================
- Statistics
================================================================================
Generated 59 mutations Killed 52 (88%)
Ran 161 tests (2.73 tests per mutation)
================================================================================

Detailed reports with information about survived mutations and the corresponding parts of code is written to build/reports/pitest/ directory relative to your project root.

Sample PIT report

Sample PIT report

Btw, there is a version 0.29 of PIT just around the corner which provides such interesting features as incremental analysis (i.e. run only mutation tests for code that have been changed). I plan to write a post about it when released, so stay tuned.

Disclaimer. I am the author of gradle-pitest-plugin.

Mutation testing is a technique which allows to discover which parts of our code are not covered by tests. It is similar to a code coverage, but mutation testing is not limited to the fact that a given line was executed during tests. The idea is to modify the production code (introduce mutations) which should change its behavior (produce different results) and cause unit tests to fail. The lack of the failure may indicate that given part was not covered good enough by the tests. The idea of mutation testing is quite old, but it is rather unpopular. Despite the fact I am rather experienced in testing I found it just recently reviewing a beta version of the new book about testing.

PIT is “a fast bytecode based mutation testing system for Java that makes it possible to test the effectiveness of your unit tests”. It is a very young project, but very promising. It offers a set of mutation operators which among others modify conditional statements, mathematical operations, return values and methods calls.

Starting with the recently released version 0.25 PIT (experimentally) supports TestNG based tests (in addition to JUnit based). To use it from Maven it is required to add pitest-maven plugin to pom.xml:

<plugin>
    <groupId>org.pitest</groupId>
    <artifactId>pitest-maven</artifactId>
    <version>0.25</version>
<!--
    <configuration>
        <inScopeClasses>
            <param>info.solidsoft.blog.pitest.*</param>
        </inScopeClasses>
        <targetClasses>
            <param>info.solidsoft.blog.pitest.*</param>
        </targetClasses>
    </configuration>
-->
</plugin>

In many cases it would be enough. inScopeClasses (mutable classes and tests for running) and targetClasses (only candidates for mutation) by default use project groupId and usually can be omitted. There are several options that can be configured in the plugin configuration. “mvn org.pitest:pitest-maven:mutationCoverage” performs modified tests and generates mutation report which by default is saved in target/pit-reports/yyMMddHHmm directory.

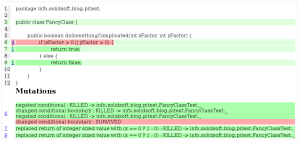
A sample report (click to enlarge) for a specified class shows both line coverage and mutation coverage. Despite 100% line coverage (lines with light green background), PIT found that a test data set does not cover properly boundary conditions.

Sample PIT report

Sample PIT report