Posts Tagged ‘spring’

Learn how leverage Spock 1.2 to slice a Spring context of a legacy application writing integration tests.

IMPORTANT. This blog site has been archived. You may read an updated version of this post here.
Visit https://blog.solidsoft.pl/ to follow my new articles.

Have you ever wanted, having some legacy application which you were starting to work on, to write some tests to get know what is going on and possibly be notified about regressions? That feeling when you want to instantiate a single class and it fails with NullPointerException. 6 replaced (with difficulty) dependencies later there are still some errors from the classes that you haven’t heard about before. Sounds familiar?

There are different techniques to deal with hidden dependencies. There is the whole dedicated book about that (and probably a few other that I haven’t read). Occasionally, it may be feasible to start with the integration tests and run through some process. It may be even more “entertaining” to see what exotic components are required to just setup the context, even if they are completely not needed in our case. Thank you (too wide and carelessly used) @ComponentScan :).

Injecting stubs/mocks inside the test context is a way to go as an emergency assistance (see the last paragraph, there are better, yet harder approaches). It can be achieved “manually” with an extra bean definition with the @Primary annotation (usually a reason to think twice before doing that) for every dependency at which level we want to make a cut of (or for every unneeded bean which is instantiated by the way). @MockBean placed on a field in a test is more handy, but still, it is needed to define a field in our tests and put the annotation on it (5? 10? 15 beans?). Spock 1.2 introduces somehow less know feature which may be useful here – @StubBeans.

Mockied dependencies Spring context

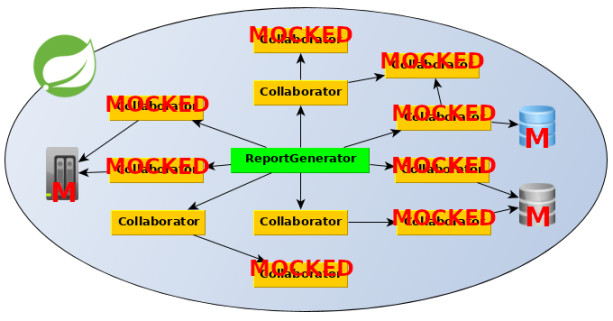
It can be used to simply provide a list of classes which (possible) instances should be replaced with stubs in the Spring test context. Of course before the real objects are being instantiated (to prevent for example NPE in a constructor). Thanks to that up to several lines of stubbing/mock injections:

@RunWith(SpringRunner.class) //Spring Boot + Mockito
@SpringBootTest //possibly some Spring configuration with @ComponentScan is imported in this legacy application
public class BasicPathReportGeneratorInLegacyApplicationITTest { //usual approach

    @MockBean
    private KafkaClient kafkaClientMock;

    @MockBean
    private FancySelfieEnhancer fancySelfieEnhancerMock;

    @MockBean
    private FastTwitterSubscriber fastTwitterSubscriberMock;

    @MockBean
    private WaterCoolerWaterLevelAterter waterCoolerWaterLevelAterterMock;

    @MockBean
    private NsaSilentNotifier nsaSilentNotifierMock;

    //a few more - remember, this is legacy application, genuine since 1999 ;)
    //...

    @Autowired
    private ReportGenerator reportGenerator;

    @Test
    public void shouldGenerateEmptyReportForEmptyInputData() {
        ...
    }
}

can be replaced with just one (long) line:

@SpringBootTest //possibly some Spring configuration with @ComponentScan is imported in this legacy application
@StubBeans([KafkaClient, FancySelfieEnhancer, FastTwitterSubscriber, WaterCoolerWaterLevelAterter, NsaSilentNotifier/(, ... */])
  //all classes of real beans which should be replaced with stubs
class BasicPathReportGeneratorInLegacyApplicationITSpec extends Specification {

    @Autowired
    private ReportGenerator reportGenerator

    def "should generate empty report for empty input data"() {
        ....
    }
}

(tested with Spock 1.2-RC2)

It’s worth to mention that @StubBeans is intended just to provide placeholders. In a situation it is required to provide stubbing and/or an invocation verification @SpringBean or @SpringSpy (also introduced in Spock 1.2) are better. I wrote more about it in my previous blog post.

There is one important aspect to emphasize. @StubBeans are handy to be used in a situation when we have some “legacy” project and want to start writing integration regression tests quickly to see the results. However, as a colleague of mine Darek Kaczyński brightly summarized, blindly replacing beans which “explode” in tests is just “sweeping problems under carpet”. After the initial phase, when we are starting to understand what is going on, it is a good moment to rethink the way the context – both in production and in tests – is created. The already mentioned too wide @ComponentScan is very often the root of all evil. An ability to setup a partial context and put it together (if needed) is a good place to start. Using @Profile or conditional beans are the very powerful mechanisms in tests (and not only there). @TestConfiguration and proper bean selection to improve context caching are something worth to keep in your mind. However, I started this article to present the new mechanism in Spock which might be useful in some cases and I want to keep it short. There could be an another, more generic blog post just about managing the Spring context in the integration tests. I have to seriously thing about it :).

Discover how to automatically inject Spock’s mocks and spies into the Spring context using Spock 1.2.

IMPORTANT. This blog site has been archived. You may read an updated version of this post here.
Visit https://blog.solidsoft.pl/ to follow my new articles.

Coffee beans with 3 different beans

Stubs/mocks/spies in Spock (and their life cycle) have been always tightly coupled with the Spock Specification class. It was only possible to create them in a test class. Therefore, using shared, predefined mocks (in both unit and integration tests) was problematic.

The situation was slightly improved in Spock 1.1, but only with the brand new Spock 1.2 (1.2-RC1 as a time of writing) using the Spock mocking subsystem in Spring-based integration tests is as easy as using @SpringMock for Mockito mocks in Spring Boot. Let’s check it up.

Btw, to be more cutting edge in addition to Spock 1.2-RC1, I will be using Spring Boot 2.1.0.M2, Spring 5.1.0.RC2 and Groovy 2.5.2 (but everything should work with the stable versions of Spring (Boot) and Groovy 2.4).

One more thing. For the sake of simplicity, in this article, I will be using a term ‘mock’ to refer also stubs and spies. They differs in behavior, however, in a scope of injecting it into the Spring context in the Spock tests it usually doesn’t matter.

Spock 1.1 – manual way

Thanks to the work of Leonard Brünings, mocks in Spock were decoupled from the Specification class. It was finally possible to create them outside and to attach it later on into a running test. It was the cornerstone of using Spock mocks in the Spring (or any other) context.

In this sample code we have the ShipDatabase class which uses OwnShipIndex and EnemyShipIndex (of course injected by a constructor :) ) to return aggregated information about all known ships matched by name.

//@ContextConfiguration just for simplification, @(Test)Configuration is usually more convenient for Spring Boot tests
//Real beans can exist in the context or not
@ContextConfiguration(classes = [ShipDatabase, TestConfig/*, OwnShipIndex, EnemyShipIndex*/])
class ShipDatabase11ITSpec extends Specification {

    private static final String ENTERPRISE_D = "USS Enterprise (NCC-1701-D)"
    private static final String BORTAS_ENTERA = "IKS Bortas Entera"

    @Autowired
    private OwnShipIndex ownShipIndexMock

    @Autowired
    private EnemyShipIndex enemyShipIndexMock

    @Autowired
    private ShipDatabase shipDatabase

    def "should find ship in both indexes"() {
        given:
            ownShipIndexMock.findByName("Enter") >> [ENTERPRISE_D]
            enemyShipIndexMock.findByName("Enter") >> [BORTAS_ENTERA]
        when:
            List<String> foundShips = shipDatabase.findByName("Enter")
        then:
            foundShips == [ENTERPRISE_D, BORTAS_ENTERA]
    }

    static class TestConfig {
        private DetachedMockFactory detachedMockFactory = new DetachedMockFactory()

        @Bean
        @Primary    //if needed, beware of consequences
        OwnShipIndex ownShipIndexStub() {
            return detachedMockFactory.Stub(OwnShipIndex)
        }

        @Bean
        @Primary    //if needed, beware of consequences
        EnemyShipIndex enemyShipIndexStub() {
            return detachedMockFactory.Stub(EnemyShipIndex)
        }
    }
}

The mocks are created in a separate class (outside the Specification) and therefore DetachedMockFactory has to be used (or alternatively SpockMockFactoryBean). Those mocks have to be attached (and detached) to the test instance (the Specification instance), but it is automatically handled by the spock-spring module (as of 1.1). For generic mocks created externally also MockUtil.attachMock() and mockUtil.detachMock() would need to be used to make it work.

As a result it was possible to create and use mocks in the Spring context, but it was not very convenient and it was not commonly used.

Spock 1.2 – first class support

Spring Boot 1.4 brought the new quality to integration testing with (Mockito’s) mocks. It leveraged the idea, originally presented in Springockito back in 2012 (when the Spring configuration was mostly written in XML :) ) to automatically inject mocks (or spies) into the Spring (Boot) context. The Spring Boot team extended the idea and thanks to having it as the internally supported feature it (usually) works reliably just by adding an annotation or two in your test.

Similar annotation-based mechanism is built-in in Spock 1.2.

//@ContextConfiguration just for simplification, @(Test)Configuration is usually more convenient for Spring Boot tests
//Real beans can exist in the context or not
@ContextConfiguration(classes = [ShipDatabase/*, OwnShipIndex, EnemyShipIndex*/])
class ShipDatabaseITSpec extends Specification {

    private static final String ENTERPRISE_D = "USS Enterprise (NCC-1701-D)"
    private static final String BORTAS_ENTERA = "IKS Bortas Entera"

    @SpringBean
    private OwnShipIndex ownShipIndexMock = Stub()  //could be Mock() if needed

    @SpringBean
    private EnemyShipIndex enemyShipIndexMock = Stub()

    @Autowired
    private ShipDatabase shipDatabase

    def "should find ship in both indexes"() {
        given:
            ownShipIndexMock.findByName("Enter") >> [ENTERPRISE_D]
            enemyShipIndexMock.findByName("Enter") >> [BORTAS_ENTERA]
        when:
            List<String> foundShips = shipDatabase.findByName("Enter")
        then:
            foundShips == [ENTERPRISE_D, BORTAS_ENTERA]
    }
}

There is not much to be added. @SpringBean instructs Spock to inject a mock into a Spring context. Similarly, @SpringSpy wraps the real bean with a spy. In a case of @SpringBean it is required to initialize a field to let Spock know if we plan to use a stub or a mock.

In addition, there is also a more general annotation @StubBeans to replace all defined beans with stubs. However, I plan to cover it separately in an another blog post.

Limitations

For those of you who look forward to rewrite all Mockito’s mocks to Spock’s mocks in your Spock tests right after the lecture of this article there is a word of warning. Spock’s mocks – due to their nature and relation to Specification – have some limitations. The implementation under the hood creates a proxy which is injected into the Spring context which (potentially) replaces real beans (stubs/mocks) or wraps them (spies). That proxy is shared between all the tests in the particular test (specification) class. In fact, it also can span across other tests with the same bean/mock declarations in the situation Spring is able to cache the context (similar situation to Mockito’s mocks or Spring integration tests in general).

However, what is really important, a proxy is attached to a tests right before its execution and is detached right after it. Therefore, in fact, every test has it’s own mock instance (it cannot be applied to @Shared fields) and it is problematic for instance to group interactions from different tests and verify them together (which usually is quite sensible, but might lead to some duplication). Nevertheless, with using a setup block (or in-line stubbing) it is possible to share stubbing and interaction expectancy.

Summary

Spock 1.2 finally brings hassle-free Spock’s stubs/mocks/spies support for using them in the Spring context which is comparable with the one provided in Spring Boot for Mockito. It is just enough to add the spock-spring module to the project test dependencies. Despite some limitations, it is one point less for mixing native Spock’s mocking subsystem with external mocking frameworks (such as Mockito) in your Spock (integration) tests. And what is nice, it should work also in plain Spring Framework tests (not only Spring Boot tests). The same feature has been implemented for Guice (but I haven’t tested it).

Furthermore, Spock 1.2 brings also some other changes including better support for Java 9+ and it is worth to give it a try in your test suite (and of course report any potentially spotted regression bugs :) ).

One more good news. In addition to the Leonard’s work who made Spock 1.2 possible and a legion of bug reporters and PR contributors, since recently, there are also some other committers who are working on making Spock even better. Some of them you may know from some other popular FOSS projects. What is more, Spock 1.2 is (preliminary) planned to be the last version based on JUnit 4 and the next stable Spock version could be 2.0, leveraging JUnit 5 and (among others) its native ability to run tests in parallel.

The examples were written using Spock 1.2-RC1. It will be updated to 1.2-final once released. The source code is available from GitHub.

Btw, have you wonder if it is still worth using Spock in the time of JUnit 5? I try to help answer that question in my presentation which will be possible to see at JDD 2018, this October in Kraków, Poland. See you there.

JDD 2018 logo with date

The lead photo based on the Couleur‘s work published in Pixabay, CC0 1.0

Learn how Spring 4.2 simplifies handling transaction bound events (e.g. sent just after a database commit).

Introduction

As you probably already know (e.g. from my previous blog post) it is no longer needed to create a separate class implementing ApplicationListener with onApplicationEvent method to be able to react to application events (both from Spring Framework itself and our own domain events). Starting with Spring 4.2 the support for annotation-driven event listeners was added. It is enough to use @EventListener at the method level which under-the-hood will automatically register corresponding ApplicationListener:

    @EventListener
    public void blogAdded(BlogAddedEvent blogAddedEvent) {
        externalNotificationSender.blogAdded(blogAddedEvent);
    }

Please notice that using domain objects in the events has notable drawbacks and is not the best idea in many situations. Pseudodomain objects in the code examples were used to not introduce unnecessary complexity.

Transaction bound events

Simple and compact. For “standard” events everything looks great but in some cases it is needed to perform some operations (usually asynchronous ones) just after the transaction has been committed (or rolled back). What’s then? Can the new mechanism be used as well?

Business requirements

First, a small digression – business requirements. Let’s imagine the super fancy blog aggregation service. An event is generated everytime the new blog is added. Subscribed users can receive an SMS or a push notification. The event could be published after the blog object is scheduled to be saved in a database. However, in in a case of commit/flush failure (database constraints violation, an issue with ID generator, etc.) the whole DB transaction would be rolled back. A lot of angry users with broken notification will appear at the door…

Technical issues

In modern approach to transaction management, transactions are configured declaratively (e.g. with @Transactional annotation) and a commit is triggered at end of transactional scope (e.g. at the end of a method). In general this is very convenient and much less error prone (than the programmatic approach). On the other hand, commit (or rollback) is done automatically outside our code and we are not able to react in a “classical way” (i.e. publish event in the next line after transaction.commit() is called).

Old school implementation

One of the possible solutions for Spring (and a very elegant one) was presented by indispensable Tomek Nurkiewicz. It uses TransactionSynchronizationManager to register transaction synchronization for the current thread. For example:

    @EventListener
    public void blogAddedTransactionalOldSchool(BlogAddedEvent blogAddedEvent) {
        //Note: *Old school* transaction handling before Spring 4.2 - broken in not transactional context

        TransactionSynchronizationManager.registerSynchronization(
                new TransactionSynchronizationAdapter() {
                    @Override
                    public void afterCommit() {
                        internalSendBlogAddedNotification(blogAddedEvent);
                    }
                });
    }

The passed code is executed in the proper place in the Spring transaction workflow (for that case “just” after commit).

To provide support for execution in non-transactional context (e.g. in integration test cases which couldn’t care about transactions) it can be extended to the following form to not fail with java.lang.IllegalStateException: Transaction synchronization is not active exception:

    @EventListener
    public void blogAddedTransactionalOldSchool(final BlogAddedEvent blogAddedEvent) {
        //Note: *Old school* transaction handling before Spring 4.2

        //"if" to not fail with "java.lang.IllegalStateException: Transaction synchronization is not active"
        if (TransactionSynchronizationManager.isActualTransactionActive()) {

            TransactionSynchronizationManager.registerSynchronization(
                    new TransactionSynchronizationAdapter() {
                        @Override
                        public void afterCommit() {
                            internalSendBlogAddedNotification(blogAddedEvent);
                        }
                    });
        } else {
            log.warn("No active transaction found. Sending notification immediately.");
            externalNotificationSender.newBlogTransactionalOldSchool(blogAddedEvent);
        }
    }

With that change in a case of the lack of active transaction provided code is executed immediately. Works fine so far, but let’s try to achieve the same thing with annotation-driven event listeners in Spring 4.2.

Spring 4.2+ implementation

In addition to @EventListener Spring 4.2 provides also one more annotation @TransactionalEventListener.

    @TransactionalEventListener
    public void blogAddedTransactional(BlogAddedEvent blogAddedEvent) {
        externalNotificationSender.newBlogTransactional(blogAddedEvent);
    }

The execution can be bound to standard transaction phases: before/after commit, after rollback or after completion (both commit or rollback). By default it processes an event only if it was published within the boundaries of a transaction. In other case the event is discarded.

To support the execution in non-transactional context the falbackExecution flag can be used. If set to “true” the event is processed immediately if there is no transaction running.

    @TransactionalEventListener(fallbackExecution = true)
    public void blogAddedTransactional(BlogAddedEvent blogAddedEvent) {
        externalNotificationSender.newBlogTransactional(blogAddedEvent);
    }

Summary

Introduced in Spring 4.2 annotation-driven event listeners continue a trend to reduce boilerplate code in Spring (Boot) based applications. No need to manually create ApplicationListener implementations, no need to use directly TransactionSynchronizationManager – just one annotation with proper configuration. The other side of the coin is that it is a little bit harder to find all event listeners, especially if there are dozens of them in our monolith application (though, it can be easily grouped). Of course, the new approach is only an option which could be useful in a given use-case or not. Nevertheless another piece of Spring (Boot) magic flood into our systems. But maybe resistance is futile?

Please note that Spring Framework 4.2 is a default dependency of Spring Boot 1.3 (at the time of writing 1.3.0.M5 is available). Alternatively, it is possible to manually upgrade Spring Framework version in Gradle/Maven for Spring Boot 1.2.5 – it should work for most of the cases. Code examples are available from GitHub.

Btw, writing examples for that blog post gave me the first real ability to use the new test transaction management system introduced in Spring 4.1 (in the past I only mentioned it during my Spring training sessions). Probably, I will write more about it soon.

Learn how to reduce boilerplace code in event handling with annotation-driven event listeners in Spring 4.2+.

Introduction

Exchanging events within the application has become indispensable part of many applications and thankfully Spring provides a complete infrastructure for transient events (*). The recent refactoring of transaction bound events gave me an excuse to check in practice the new annotation-driven event listeners introduced in Spring 4.2. Let’s see what can be gained.

(*) – for persistent events in Spring-based application Duramen could be a solution that is worth to see

Spring logo

The old way

To get a notification about an event (both Spring event and custom domain event) a component implementing ApplicationListener with onApplicationEvent has to be created.

@Component
class OldWayBlogModifiedEventListener implements
                        ApplicationListener<OldWayBlogModifiedEvent> {

    (...)

    @Override
    public void onApplicationEvent(OldWayBlogModifiedEvent event) {
        externalNotificationSender.oldWayBlogModified(event);
    }
}

It works fine, but for every event a new class has to be created which generates boilerplate code.

In addition our event has to extend ApplicationEvent class – the base class for all application events in Spring.

class OldWayBlogModifiedEvent extends ApplicationEvent {

    public OldWayBlogModifiedEvent(Blog blog) {
        super(blog);
    }

    public Blog getBlog() {
        return (Blog)getSource();
    }
}

Please notice that using domain objects in the events has notable drawback and is not the best idea in many situations. Pseudodomain objects in the code examples were used to not introduce unnecessary complexity.

Btw, ExternalNotificationSender in this example is an instance of a class which sends external notifications to registered users (e.g. via email, SMS or Slack).

Annotation-driven event listener

Starting with Spring 4.2 to be notified about the new event it is enough to annotate a method in any Spring component with @EventListener annotation.

    @EventListener
    public void blogModified(BlogModifiedEvent blogModifiedEvent) {
        externalNotificationSender.blogModified(blogModifiedEvent);
    }

Under the hood Spring will create an ApplicationListener instance for the event with a type taken from the method argument. There is no limitation on the number of annotated methods in one class – all related event handlers can be grouped into one class.

Conditional event handling

To make @EventListener even more interesting there is an ability to handle only those events of a given type which fulfill given condition(s) written in SpEL. Let’s assume the following event class:

public class BlogModifiedEvent {

    private final Blog blog;
    private final boolean importantChange;

    public BlogModifiedEvent(Blog blog) {
        this(blog, false);
    }

    public BlogModifiedEvent(Blog blog, boolean importantChange) {
        this.blog = blog;
        this.importantChange = importantChange;
    }

    public Blog getBlog() {
        return blog;
    }

    public boolean isImportantChange() {
        return importantChange;
    }
}

Please note that in the real application there would be probably a hierarchy of Blog related events.
Please also note that in Groovy that class would be much simpler.

To generate event only for important changes the condition parameter can be used:

    @EventListener(condition = "#blogModifiedEvent.importantChange")
    public void blogModifiedSpEL(BlogModifiedEvent blogModifiedEvent) {
        externalNotificationSender.blogModifiedSpEL(blogModifiedEvent);
    }

Relaxed event type hierarchy

Historically ApplicationEventPublisher had only an ability to publish objects which inherited after ApplicationEvent. Starting with Spring 4.2 the interface has been extended to support any object type. In that case the object is wrapped in PayloadApplicationEvent and sent through.

//base class with Blog field - no need to extend `ApplicationEvent`
class BaseBlogEvent {}

class BlogModifiedEvent extends BaseBlogEvent {}
//somewhere in the code
ApplicationEventPublisher publisher = (...);    //injected

publisher.publishEvent(new BlogModifiedEvent(blog)); //just plain instance of the event

That change makes publishing events even easier. However, on the other hand without an internal conscientiousness (e.g. with marker interface for all our domain events) it can make event tracking even harder, especially in larger applications.

Publishing events in response to

Another nice thing with @EventListener is the fact that in a situation of non-void return type Spring will automatically publish returned event.

    @EventListener
    public BlogModifiedResponseEvent blogModifiedWithResponse(BlogModifiedEvent blogModifiedEvent) {
        externalNotificationSender.blogModifiedWithResponse(blogModifiedEvent);
        return new BlogModifiedResponseEvent(
            blogModifiedEvent.getBlog(), BlogModifiedResponseEvent.Status.OK);
    }

Asynchronous event processing

Updated. As rightly suggested by Radek Grębski it is also worth to mention that @EventListener can be easily combined with @Async annotation to provide asynchronous event processing. The code in the particular event listener doesn’t block neither the main code execution nor processing by other listeners.

    @Async    //Remember to enable asynchronous method execution 
              //in your application with @EnableAsync
    @EventListener
    public void blogAddedAsync(BlogAddedEvent blogAddedEvent) {
        externalNotificationSender.blogAdded(blogAddedEvent);
    }

To make it work it is only required to enable asynchronous method execution in general in your Spring context/application with @EnableAsync.

Summary

Annotation-driven event listeners introduced in Spring 4.2 continue a trend to reduce boilerplate code in Spring (Boot) based applications. The new approach looks interesting especially for small applications with a small amount of events where a maintenance overhead is lower. In the world of ubiquitous Spring (Boot) magic it is more worthy to remember that with great power comes great responsibility.

In the next blog post I will write how the new mechanism can be also used to simplify handling of transaction bound events.

Please note that Spring Framework 4.2 is a default dependency of Spring Boot 1.3 (at the time of writing 1.3.0.M5 is available). Alternatively it is possible to manually upgrade Spring Framework version in Gradle/Maven for Spring Boot 1.2.5 – it should work for most of the cases.

Unit tests are very handy. They run fast and it is possible to execute hundreds or even thousands of them very often during development (especially useful when using TDD). Nevertheless from time to time we want to test the correctness of a part of an IoC container configuration and check how those components works together when managed by an IoC context. In this tutorial I will show how to do it in a convenient way.

The easiest solution could be to set up the whole “production” IoC context. Unfortunately depending on the size of a project it can take some time (long minutes) and in addition that configuration is likely to connect to external resources like a database or a message queue which makes restriction where those tests will be able to run. What can we do to fix it?

Very often to test interactions between selected components it is not needed to make the full featured integration tests. We can use two useful techniques together: limiting context scope (?) and mocking. The idea is to set up only needed components. This can be achieved by separate a minimal Spring configuration file using in tests (possible reusing some of existing production files). However very often there is a problem with direct dependencies which behaviors (?) are not needed in our tests, but are required to set up our beans. Doesn’t it look familiar to the situation meet also in unit tests? Mocks (and Mockito) to the rescue.

Our mocks have to be put into Spring context to be able to inject into other beans created by Spring. While it can be done using pure Spring mechanisms, there is a library which makes it much easier – Springockito written by Jakub Janczak.

Note. Pure unit tests are generally much better choice. Tests using IoC context should be only used when we really need to test behaviors within a context.

To start working with Springockito it is required to add its JAR to the project dependencies. Using Maven it could be:

<dependency>
    <groupId>org.kubek2k</groupId>
    <artifactId>springockito</artifactId>
    <version>1.0.4</version>
    <scope>test</scope>
</dependency>

With Gradle:

testCompile "org.kubek2k:springockito:1.0.4"

(change 1.0.4 to the latest released version of Springockito)

Note. The following examples are simplified to does not introduce unneeded distractions. They do not have a context configuration which is worth to test and it would be easier to use pure unit tests (without a Spring context).

Let’s take following configuration where plantWaterer object requires waterSource and waterScheduler beans:

<?xml version="1.0" encoding="UTF-8"?>
<beans xmlns="http://www.springframework.org/schema/beans"
    xmlns:xsi="http://www.w3.org/2001/XMLSchema-instance"
    xsi:schemaLocation="http://www.springframework.org/schema/beans http://www.springframework.org/schema/beans/spring-beans-3.0.xsd">

    <bean id="plantWaterer" class="info.solidsoft.refcard.mockito.PlantWaterer">
        <constructor-arg name="waterSource" ref="waterSource"/>
        <constructor-arg name="waterScheduler" ref="waterScheduler"/>
    </bean>

    <bean id="waterSource" class="info.solidsoft.refcard.mockito.RiverWaterSource">
        <constructor-arg ref="smallRiver"/>
    </bean>

    <bean id="waterScheduler" class="info.solidsoft.refcard.mockito.WaterScheduler"/>

</beans>

RiverWaterSource relies on an external resource which could be problematic during tests. To override it following configuration (with the additional namespace mockito) could be used.

<?xml version="1.0" encoding="UTF-8"?>
<beans xmlns="http://www.springframework.org/schema/beans"
    xmlns:xsi="http://www.w3.org/2001/XMLSchema-instance"
    xmlns:mockito="http://www.mockito.org/spring/mockito"
    xsi:schemaLocation="http://www.springframework.org/schema/beans http://www.springframework.org/schema/beans/spring-beans-3.0.xsd
                        http://www.mockito.org/spring/mockito https://bitbucket.org/kubek2k/springockito/raw/tip/springockito/src/main/resources/spring/mockito.xsd">

    <mockito:mock id="waterSource" class="info.solidsoft.refcard.mockito.WaterSource"/>

</beans>

Make a note that there is even no try to create the original bean. This is very useful in a situation where for example DAO would like to make a connection to a database during start up (which could take some time and is very fragile).

With Springockito it is also very easy to make a spy of existing Spring bean and inject it into another bean instead of the original bean for example to verify made interactions.

<?xml version="1.0" encoding="UTF-8"?>
<beans xmlns="http://www.springframework.org/schema/beans"
    xmlns:xsi="http://www.w3.org/2001/XMLSchema-instance"
    xmlns:mockito="http://www.mockito.org/spring/mockito"
    xsi:schemaLocation="http://www.springframework.org/schema/beans http://www.springframework.org/schema/beans/spring-beans-3.0.xsd
                        http://www.mockito.org/spring/mockito https://bitbucket.org/kubek2k/springockito/raw/tip/springockito/src/main/resources/spring/mockito.xsd">

    <mockito:spy beanName="waterSource"/>

</beans>

Mocks and spies created with a help of Springockito are just like “normal” mocks/spies which can be stubbed and verified. However there are two important differences. The instance of a mock/spy is created by Spring when a context is set up (in opposite to manual call Mockito.mock/spy() or using @Mock/@Spy annotation), so the easiest way to obtain it is to make an injection into our tests class (by name or by type).

@ContextConfiguration({<<configuration-files>>})
public class MockInjectionSpringockitoTest extends AbstractTestNGSpringContextTests {

    @Autowired
    private PlantWaterer plantWaterer;

    @Autowired	//it is safe - Springockito hid the original WaterSource bean
    private WaterSource waterSourceSpy;

    @Test
    public void shouldSpyInjectedObject() {
        //given - mocks/spies are already created, can be stubbed here

        //when
        plantWaterer.waterPlants();

        //then
        verify(waterSourceSpy).startWaterFlow();
    }
}

The seconds important difference is also related to the fact that a mock/spy is created with a context and the same instance is hold until the context shutdown. It can span across many tests or even test classes. It is important to properly reset/initialize mocks/spies manually before every test to avoid an impact of the operations done in previously executed tests. The issue has been already reported and hopefully will be resolved in the further Springockito versions.

Btw, in case of the following error:

org.springframework.beans.factory.parsing.BeanDefinitionParsingException: Configuration problem: Unable to locate Spring NamespaceHandler for XML schema namespace [http://www.mockito.org/spring/mockito]
Offending resource: class path resource [yourSpringConfig.xml]
	at org.springframework.beans.factory.parsing.FailFastProblemReporter.error(FailFastProblemReporter.java:68)
	at org.springframework.beans.factory.parsing.ReaderContext.error(ReaderContext.java:85)
(...)

make sure the Springockito JAR has been successfully added as a project dependency.

In case you prefer annotations over XML Springockito has also something for you. This is a version of Springockito which allow to do similar things, but directly in your test code.

To use it in a project it is required to add an springockito-annatations.jar to your project dependencies.

With Maven:

<dependency>
    <groupId>org.kubek2k</groupId>
    <artifactId>springockito-annotations</artifactId>
    <version>1.0.2</version>
</dependency>

With Gradle:

testCompile "org.kubek2k:springockito-annotations:1.0.2"

(change 1.0.2 to the latest released version of springockito-annotation – the numeration is not synchronized with springockito – it is an independent jar (as of 1.0.2))

@ContextConfiguration(loader = SpringockitoContextLoader.class, locations = {<<the-base-configuration-file>>})
public class MockInjectionSpringockitoTest extends AbstractTestNGSpringContextTests {

    @Autowired
    private PlantWaterer plantWaterer;

    @WrapWithSpy
    @Autowired	//to inject a spy into this field to make a verification
    private WaterSource waterSource; //spy

    @ReplaceWithMock //just replace the original bean with a mock, will be null
                     //it won't be stubbed - no need to inject
    private WateringScheduler wateringScheduler; //mock

    @Test
    public void shouldSpyInjectedObject() {
        //given - mocks/spies are already created, can be stubbed here

        //when
        plantWaterer.waterPlants();

        //then
        verify(waterSource).startWaterFlow();
    }
}

The trick here is to use a custom Spring context loader which checks (by name) if there is any bean which should be replaced with a mock or wrapped with a spy.

The code above causes waterSource bean defined in a configuration file to be wrapped with a spy and wateringScheduler bean to be replaced with a mock (the original wateringScheduler bean will not be created at all). They are both injected into plantWaterer. @ReplaceWithMock and @WrapWithSpy annotations are used only by Springockito to detect which beans should be replaced/wrapped. To get an instance of a mock/spy (to stub it or verify behavior) it is needed to use also an appropriate annotation (@Autowired, @Resource or @Inject) – see waterSource in the previous listing.

There is a limitation which force to use the same field name as a bean which should be replaced/wrapped. It should be fixed in the future.

This post is the second part of the series Beyond the Mockito refcard extending recently released my Mockito reference card.

Recently I was playing a little with Hades. Generic DAO implementation which can reduce writing a lot of boiler plate code. So far so good, but I wanted to test some mappings with bidirectional relationship using automated tests. The feature of Hibernate (and JPA implementations in general) is an ability to cache some operations in Session/EntityManager (the first level cache) reducing number of statement sending to database. Generally it’s useful, but when you try to test some DAO operations with rollback at the end of a test (instead of commit) it complicates a few things. Sample situation, persist some object. Hibernate memorize that object should be created in database, but waits with sending insert statement on flush, commit (which causes flush) or related query which needs to have that data in database to perform (like findAll). Using rollback causes that there could be no flush (all read/write operations are performed within EntityManager) and some problems which occur in normal usage from end application could remain undiscovered.
The first idea how to solve that is to call flush on EntityManager, but DAO interface in Hades (and hopefully any other custom made generic DAO) doesn’t offer that command. It could be quite dangerous to give a developer an ability to call flush whenever he/she likes in the application (at least it could have the negative performance impact). Ok, the second idea is to cast interface to it’s implementation. Even in Hades implementation has protected getEntityManager method to allow to use EntityManager directly in specified DAOs. Let’s play. Small utility class in the same package, cast DAO interface to GenericDaoSupport and…

java.lang.ClassCastException: $Proxy38 cannot be cast to org.synyx.hades.dao.orm.GenericJpaDao

Ups, something is wrong. The problem is that our DAO interface implementation autowired with our test is not directly GenericJpaDao, but proxy object made by Spring. It’s not even Hades specific issue. Similar situation could happen when home made generic DAO is used with Spring.

Looking at Spring proxy object in debugger shows it’s a quite complicated object and it wouldn’t be easy to “find” target object. What is more I try to not use dirty hacks when not needed, so I started to look for some other way to get target class using Spring mechanisms itself. After some digging I have found Advised interface which Spring proxy implements. With its help it is possible to do:

targetObject = ((Advised)daoInterface).getTargetSource().getTarget();

which can be without further problems cast to GenericJpaDao which offers getEntityManager. Having EntityManager it’s simple to do flush or detach on given entity. I have found it useful to create an util class offering mentioned functionality for the usage in DAO tests across the project.

package package.with.your.dao.implementation;

import required.classes;

/**
 * Utility class allowing to get EntityManager (to perform flush and/or detach) from DAO interface (available even as Spring proxy).
 *
 * Licensed under the terms of Apache Software License version 2.
 *
 * @author Marcin Zajączkowski, https://solidsoft.wordpress.com/
 */
public final class DaoTestUtil {

    private DaoTestUtil() {
    }

    public static EntityManager getEntityManagerFromSpringEnhancedDaoInterface(GenericDao<?, ?> daoInterface) {

        try {
            Object targetObject = null;
            if (daoInterface instanceof Advised) {
                //Spring proxy
                targetObject = ((Advised)daoInterface).getTargetSource().getTarget();
            } else {
                targetObject = daoInterface;
            }

            GenericJpaDao daoImpl = (GenericJpaDao)targetObject;
            return daoImpl.getEntityManager();
        } catch (Exception e) {
            throw new IllegalArgumentException("Unable to get GenericJpaDao from " + daoInterface.getClass().getName(), e);
        }
    }

    public static void doFlushAndDetachEntityUsingEntityManagerFromDao(GenericDao<?, ?> daoInterface, Object entityDoDetach) {
        EntityManager em = getEntityManagerFromSpringEnhancedDaoInterface(daoInterface);
        em.flush;
        em.detach(entityDoDetach);
    }
}